My first S.C.A. event was Rowany Festival 1986, but even before that time I had made Edmund’s acquaintance through the same group of friends that dragged me along to that event (for my own good, or so they said).
I attended the occasional event and then at another festival, I think 1988, while for a variety of personal reasons and a lack of anything better to do, I was attempting to drain the tavern single handed, Edmund talked me into attending my first rapier practice. I have much to thank him for besides the pleasure that I have taken in the combat and friends I have made through it.
In 1991 I attended the first Ynys Fawr Baronial Investiture, Edmund was there as well and classes were conducted (I know, Edmund teaching, what a surprise). It was at this event that Edmund achieved renown by having a particular cutting attack named after him, it occurred during a demonstration bout, I had thrust in a low line attack to Edmund’s left abdomen, he parried my blade down and moved to place himself off line. What actually occurred however was that my blade ended between his legs and I had my hand on his forte. We paused for a moment, then I saw the look of realization on his face, and, with a smile on my face that went from ear to ear, I turned my back on him while raising my sword until positive pressure was achieved and walked off the field without looking back.
This play was henceforth known as the “Coup de Edmund”, no one laughed louder or longer than he did that day or on each occasion when the tale was retold.
Thank you for listening to an old mans fond memory of a friend.
Don Dameon Greybeard, Ancient Guild Master of Fence.
By Aylwin Greymane Originally published in Punta Dritta July AS XXXVIII (2003)
The biggest single problem we have faced to date in Innilgard has been a supply of gorgets. The major part of the problem has been getting access to anyone with a supply of suitable metal and tools to then work it with, who is in commuting distance for those who are short on transport.
Having had a quarter hide sitting in my shed for the last 4 or 5 years, I finally decided to put aside a day to try making a gorget from leather and testing it out. The leather was bark tanned and it was the minimum 4mm thickness required by the Lochac Rapier rules, but it was flexible leather, unlike the preferred ‘masonite’ leather, so I was a bit dubious about it.
The strips for the front and back of the neck were cut 8cm deep and roughly 17cm long to fit round my neck comfortably. Aviator-style tinsnips ($10 or less from your local hardware store) cut the leather very easily, as did dressmakers scissors. The two pieces were attached to each other with a soft but thick leather hinge and split rivets, two per side, on one side, and a strap and buckle the other.
I then taped blue closed cell foam on both bits, strapped it on and experimented by getting poked gently with a fibreglass blade and then steel schlager and hanwei blades. The leather deformed quite a bit for all of the blades, even with being strapped on quite firmly and the hits by necessity being fairly soft. As it was, I certainly wasn\’t going to wear it into combat.
A bit more searching in the shed unearthed some galvanised iron, about 20 gauge since it was fractionally under a millimetre thick. It was a flat piece but the usual rippled stuff beaten flat with a hammer would also suffice. Possibly even better since galv will take a small amount of gentle work hardening. I cut two segments about a centimetre and a half less deep and about two centimetres less wide than the leather, again with the aviator snips which made easy work of the iron. These were then curved over a handy tree branch with bare hands, secured to that shape with a few hammer taps, then riveted to the gorget with split rivets, two per side. The closed cell foam was then glued on.
There was an immediately noticeable difference to the gorget\’s stiffness. If I bent it by hand unfastened, it would still deform but I now needed a lot more pressure from both hands to make it deform. I then strapped it on and had the poke test re-performed. It turned out the iron made all the difference when the gorget was strapped in place. I took a number of throat shots, including a few that would have had me screaming at the culprit in a combat situation, and came out very satisfied.
From observation, when strapped on the gorget does deform very slightly under a direct hard thrust from a steel blade but then springs back into the curve again. The combination of leather, iron and foam means the force of any throat hit gets spread across the neck instead of concentrated in one spot. As the wearer, I felt no discomfort from the shots and never felt I was in any danger of getting hurt.
I then put the necessary extra segments on to cover the throat hollow and the cervical vertebrae so that it was fully legal, dyed it blue for looks, and spent an hour or two fencing against my normal partner. He managed a shot or two into the gorget and it was no more noticeable than if I had been wearing my normal steel gorget.
End result was a usable and legal gorget that took me a couple of hours to make, could be created out of easily obtainable, cheap materials and could be made with the normal tools found around a home, without any need for the use of metalworking tools.
One caveat though; I wouldn’t ever wear it in heavy combat. While very adequate in spreading the force of a direct thrust from a rapier, I think a crushing blow from an SCA sword or mace across the throat while wearing this style of gorget would cause massive deformation of the metal just from the power of the impact, and create subsequent possibly serious problems.
If anyone has any questions or comments, I can be contacted via my contacts page.
In service Don Aylwin Greymane – Provost of the Royal Guild of Defence
Originally published in Punta Dritta January AS XL (2006)
This pathfinder has been complied to assist those members of the Society for Creative Anachronism pursuing the rank of Free Scholar in The Royal Guild of Defence, a subgroup of that organisation. These resources have been put together with the help of the Masters of the Guild (the heads of the Guild, those authorised to teach by the Crown) at the Gore Street Ward, and will aid in gaining knowledge of the schools and styles of fencing that are available within the set limits of the Guild (pre-17th century Europe).
Free Scholar: The first ranking in the Guild. A student that has a basic capability in Renaissance fencing but has no in-depth knowledge of the Renaissance Fencing Masters, and has yet to develop a full range of fencing styles or concepts in civilian combat. Don Francois Henri Guyon, Guildmaster of the Royal Guild of Defence of Lochac
Search strategies
As the information in this area is diverse, you will not find it on one shelf of a library. Try these keywords/ subjects as a starting point in library databases and on the Internet to help with your search.
Names of Renaissance Masters:
* Vincentio Saviolo * Joseph Swetnam * Giacomo Di Grassi * Salvator Fabris * Hans Talhoffer * Achille Marozzo * Camillo Agrippa * Henry de St. Didier * Angelo Viggiani
Library of Congress subject headings:
* Fencing- England-History-16th century * Swordplay-England-History-16th century * Dueling- England-History-16th century * Fencing- Europe- Early works to 1800 * Hand-to-hand fighting- Europe- Early works to 1800
British Library:
* Military art and science- History Medieval- 500-1500 * Combat- History * Swordplay- History * Fencing- History
* William Wilson * Tony Soper * Christian Tobler * Mark Tobler * Sir Charles Oman * Mark Loades * Ramon Martinez * Alfred Hutton
Books
There are a number of publications available on this topic. These have been recommended for Free Scholars by the Masters of Defence.
Wilson, WE. 2002, Art of Defence: Introduction to the Use of the Rapier, Chivalry Bookshelf, Union City, CA.
An acknowledged instructor in Italian rapier and side sword by the International Master of Arms Federation, this publication offers a practical instruction in the Italians style of fencing. Instructions are accompanied with multiple photos. Include a bibliography with primary and secondary sources.
Talhoffer, H 2000, Medieval combat: A fifteenth-century illustrated manual of swordfighting and close-quarter combat, (ed. & trans.) M. Rector, Greenhill Books, London, in assoc. with Stackpole Books, Mechanicsville, PA.
The first English translation of Talhoffer’s Fechtmeister (Fight Master) professional fencing manual of 1467. With a forward by John Clements, the Director of the Historical Armed Combat Association, this book is a catalogue of fencing actions with short descriptions.
Turner, C & Soper, T 1990, Methods and practice of Elizabethan swordplay, Southern Illinois University Press, Carbondale, USA.
This book analyses the only three existing Elizabethan fencing manuals written in English before 1600. As well as being a technical manual, it explores the influence of the rapier on the various social classes and the clash between those following the old style and the new.
Tobler, Christian Henry 2001, Secrets of German medieval swordsmanship: Sigmund Ringeck\’s commentaries on Johannes Liechtenauer\’s verse, Chivalry Bookshelf, Union City, California.
This German text, translated into English, provides the converted text, commentary by the author along with a photographic interpretation of the work. This work not only talks about armed combat but also unarmed combat.
Hutton A 2003, The sword and the centuries, Wren\’s Park Publishing, Ashcroft, Barton-Under- Needlewood, DE13 8BA.
Audio-visual
The blow by blow guide to sword fighting in the renaissance style 1992, VHS, Running Wolf Productions, Corsock, Scotland, training aid, written and produced by Mike Loads
This training aid deals with the basic principles of how to fight in the renaissance style. It includes Rapier and dagger, cloak, the target and the buckler, and how a sword should be worn.
La Scherma Italiana: basics of Italian rapier fencing Volume One n.d., DVD, Palpable Hit Productions, Canyon Country, CA, training aid, ed. Mark Petrigac; produced by Anthony De Longis; directed by Ed Douglas; starring Maestro Ramon Martinez.
This DVD is designed to give a working vocabulary of the theory and practice of Italian rapier as it existed by the 17th century.
La Scherma Italiana: basics of Italian rapier fencing Volume Two n.d., DVD, Palpable Hit Productions, Canyon Country, CA, training aid, ed. Mark Petrigac; produced by Anthony De Longis; directed by Ed Douglas; starring Maestro Ramon Martinez.
This is the companion DVD to Volume One. Its purpose it to give applications of the theories and practices delivered in volume one.
The Association for Renaissance Martial Arts (ARMA) presents a list of key terms, phrases, concepts, principles and ideas to encourage the use of proper vocabulary in relation to historical fencing.
This indexing service provides information that will improve understanding on what happening in the world of this time; to help Free Scholars put their fencing in context.
Punta Dritta index
An index of The Royal Guild of Defences electronic magazine. Published 6 monthly, article focus on the teaching, practice and research of fencing in the Guilds set parameters. NOTE: Now contained as separte articles on this website
Mailing Lists
The discussions on these lists can help answer questions you may have.
The Academy of European Medieval Martial Arts is a not for profit corporation for the research and study, reconstruction and practice of early period martial arts. The library has access to various other libraries, museums, and institutions pertaining to this area of study.
This is the Lochac (Australia & New Zealand) homepage for the Society for Creative Anachronism (SCA). On this site you will find the Guild Charter, the current rules for fencing and links to the international SCA groups where you may find out what the fencers in other countries are studying.
For much of the middle ages it was uncommon for people to wear swords as part of everyday dress. A knight would wear his sword on ceremonial occasions, and travellers would wear swords on journeys, but most people in England and France would carry only their belt knife.
In the early part of the Renaissance period, it became common for a gentleman to wear his sword at all times and in all places. Generally, this coincided with the decline of the land-owning class and the dramatic impact of plague on the population.
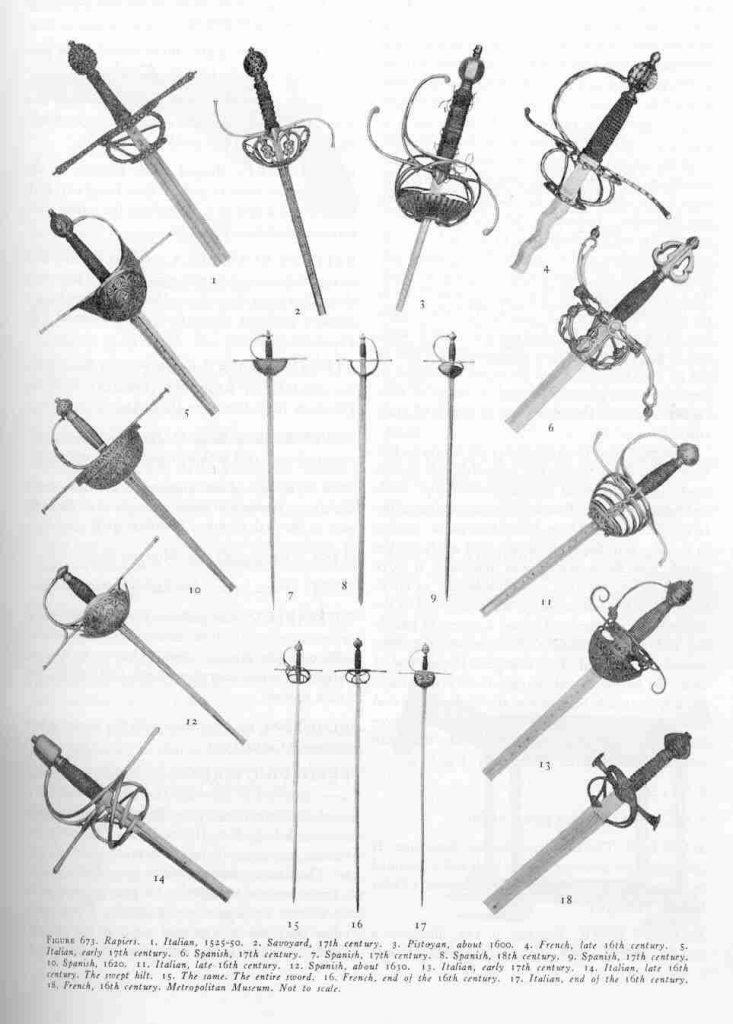
Initially, the sword was the same as used on the battlefield: broad bladed and cross hilted (Fig 1). Such a sword could hang from a person’s belt with little problem.
Figures 1-3 – Sword shapes: cross-hilted, backsword and rapier
As time progressed, however, the hilt of the sword became more complex to protect the hand and the blade became longer in an attempt to outreach the opponent. Some rapier blades reached between 48 and 60 inches in the length, making the simple act of drawing the sword difficult and dangerous.
George Silver, a conservative anti-rapier voice of the late 16th Century, writes that the normal length of a blade should be between a yard and one inch for the shortest man, to a yard and four or five inches for the tallest. We can assume, therefore, that rapiers commonly being used in London at the end of the century were longer than this.
In order to wear such a long rapier, it becomes necessary to angle the blade hanging from the belt, to prevent it dragging along the ground. There were three common devices used to accomplish this: Slings, Hanger and Baldric.
Belt and slings
Figure 4 – Belt & slings
The Belt and Slings (Figure 4) is a simple affair. Two or three slides grip the scabbard of the sword. A strap (called a sidepiece) connects from the slings to the belt on the opposite side of the body, and is adjustable to control the angle of the sword.
Whilst this will keep the sword from the ground, the narrow range of the attachments will allow the sword to flap around a bit. It is not unknown for the slings to have a second strap around the leg to give more stability.
Hanger
Figure 5 – Hanger
An adaptation of the Belt and Slings is the Hanger (Figure 5). This increases the number of slides and supports them with a broad panel of leather. This tends to be much more controllable and stable.
Both the Hanger and the Belt and Slings can be attached to a girdle or normal belt through the use of frogs, or friction loops, on the belt.
Baldric
Figure 6 – Baldric
The final way of carrying a sword is the baldric (Figure 6). This is a simple belt, worn over the shoulder and sloping down to the opposite hip. The sword is attached by use of slides. There is, however, no easy way to wear a dagger on the baldric and so it is often seen as a military fashion or a very late period fashion.
Bowing
All these ways of carrying a sword require the rapier to trail a long way behind the body. When bowing from the waist, this causes the end of the sword to tip up (usually into somebody else). This could be a cause of a duel, so great care was taken to control thei sword when moving around. However, it is quite threatening to grip the rapier constantly by the handle, and this could also get the wearer into trouble.
For a right-handed fencer, the key is to use the inside and outside of the left hand to guide the rapier in the movement. Bowing is altered to the form of Reverenza used in Renaissance dance. The drawing back of the left foot allows the wearer to push the hilt wide of the body at the same time as extending the arms in the bow. This movement pushes the tip of the sword close behind the left ankle and thus out of the way.
Cape
The fashionable style for a cape was to wear it over the left shoulder. This leaves the sword arm free, whilst still affording some warmth and allowing the embroidery to be displayed.
If the cape was fastened with ties or buttons, they would run to the right armpit, tying diagonally across the chest. This leaves the left arm free to grasp the knife, affixed to the back of the belt, whilst the right arm is able to reach overhand. An Alta guard is almost impossible to achieve if the cape is tied over the right shoulder.
Hat
Surprisingly enough, most people in medieval and Renaissance Europe wore hats. I say surprisingly, because it is uncommon to see people in the SCA wearing them.
A fashionable Renaissance gentleman would feel just as undressed going out without a hat, as without his sword. Given the cold snap that covered Europe during the 16th century (which froze over the River Thames at times), it was very rare to see somebody without a hat.
During the bow, the hat is tipped or removed entirely, depending on the rank of the person you are being presented to: a touch of the brim or tug on the flat cap for a common acquaintance; complete removal for a lady or ranked person.
This is difficult to coordinate with sword and cape, especially on the dance floor, without disembowelling somebody behind you. A soft cap is gripped by the brim and replaced from the back of the head forward. This allows the drape of a soft cap to catch the back of the head. A solid hat is opposite, where the hat is gripped by the front of the brim and replaced on the temple and slid back into place.
Images taken from www.armor.com and www.imperialweapons.com
by Guildmaster ibn Jelal, OWL Originally published 25 Nov 2004
Introduction
Many of you will have seen the blue and white livery jackets used by the instructors of the Rowany Guild School. Many of you have asked how to make your own. Well I’ve finally bowed to the pressure, so the intsructions will follow.
When Luan first raised the idea to play a Pas d’Arms in rapier fencing at Rowany Festival 2003, the Rowany Guild School instructors decided we had to put a team together just to teach our whippersnapper student a lesson or two! 🙂 Guildmaster Silfren and myself both have a love of pagentry, so as a group we decided to have a common set of kit for the Pas, which would include some form of livery as fencing armour. Our plan set, it was it was time to go off and do some research on what is appropriate. We had settled on a rough time period of around 1500, since we didn’t want to go the whole doublet and breaches route. One of the things that caught our imagination was the work done by the Companie of St George over in Switzerland, which led us to the basic short sleeve livery jacket used during that period. (See the references for our sources of what could be done.)
With a rough design choice, there were a few criteria I had to address. (OK so I’m the one in the group that has the necessary sewing skills!) Firstly it should be fairly easy to make, as well as look good. It should be something that is easy to move in. It should be easy to get into and out of. It should be nice and light, so we don’t overheat. The last couple was driven by my nasty habit of overheating quickly. The short sleeve livery coats were perfect choices in this area, as they would go over a single layer long sleeve shirt, would be front opening using hooks and eye closures, and were very easy to adjust to fit all of us. The material choice ended up being 3 layers of calico, and an outer layer of cotton drill. The combination is exceptionally light, breathes very well, and passes the drop test for fencing armour. It looked like we had the makings of some great fencing armour. The truth is the four of us don’t really fence in anything else but the livery jackets these days, they ended up being so good to wear!
Drafting the Pattern
I used the basic jacket or arming jack pattern for the livery jackets. It’s easy to draft, and can be modelled for each person’s measurements. You need to take the following measurements to draft the pattern.
A = Shoulder width measured across back B = Shoulder drop C = Shoulder length from neck to shoulder point D = Width across chest between arms (measure with arms held forward) E = Chest circumference measured just under arm F = Waist circumference G = Hip circumference H = neck to waist I = waist to hip J = total length (usually mid-thigh for a livery jacket)
Divide A and D in half, and divide E to G by 4. These are the measurements used for drafting the pattern, as shown below.
Figure 1 – Jacket Drafting Pattern
This block pattern is your basis for cutting out the test pieces (a toile) to make sure you’ve got the pattern right. Use a cheap material for patterning, it’s going to be used mostly for getting the pattern right, not for wearing. I usually use calico for this bit. Mark out the pattern on the toile material, and then mark out the seam allowance lines, ie lines parallel to the pattern lines but wider by the required seam allowance. I generally use 1.5 cm for my seam allowance. Cut the toile material on the seam allowance lines, and sew them together on the pattern lines. Use a longer stitch length, say 3-4 mm since you’ll pull it apart later. Put on the toile piece, and check it for fit. Now is the time to make sure the arm holes are large enough, that it fits across the chest properly etc. Pin, remark and adjust the pattern until you’re satisfied it fits properly. In some cases you may need to pull the toile apart and recut and resew to get it right.
Make sure the jacket closes properly at the front. Just to make a quick note here, what you are looking for is that the edges pretty much butt up with a slight overlap for seam allowance. If like me you go for hooks and eyes, that’s all you need. If you want to use buttons or points for closures, you will need to extend each of those front pieces about 3 cm so that it has sufficient overlap for the closures. Here’s a hint if you go that route, write “extend by 3cm” on the toile piece openings so that you don’t forget!
Right, now you’ve got the body piece right, it’s time to measure up the armhole for the sleeve pattern. You want the armhole to be sufficiently large that the arm can move at the shoulder, and the toile piece doesn’t crease in response. The best way to describe it is the attachment lines of the shoulder muscles around the chest, should be about where the armhole is located. If the armhole cuts across those muscles, you get the feeling that the jacket is binding up the arm sometimes. Clear as mud isn’t it?!
Anyway, while wearing the toile, make 2 marks on the toile. One is about the middle of the armhole at the back, and the other is the middle at the front. If you look closely, there is a point in the armhole where it turns to go under the arm, that’s the best point to mark. Ok these points are numbered as follows, A = the middle mark at the back, B = the shoulder seam, C = the from middle mark, D = the side seam. Measure A-B, B-C, C-D and D-A. These 4 measurements will give you the correct shape for the top of the arm.
To draft the sleeve, draw 3 parallel lines about 3 cm apart from each other. Starting from the left of those lines, measure in your seam allowance and draw a line at right angles to the parallel lines. Mark this line ‘A’. Measure along the parallel lines distance A-B, draw another right angle line and mark it ‘B’. Repeat for B-C, C-D and D-A. Mark out the seam allowance beyond the right-hand side ‘A’. Measure down the line marked as ‘C’ and mark the distance that would be the length of the sleeve. This measurement is made from the middle line of the 3 parallel lines. Add a seam allowance to that line and draw a right angle line the length of the sleeve width at the end of your sleeve length line. Add a seam allowance to each end of the sleeve width line. Connect those 2 points to the seam allowance lines at the top of the sleeve, on the middle line of the 3 parallel lines.
Figure 2 – Sleeve Head Pattern
Now we get to draw the top of the sleeve. Starting from line ‘A’ on the left-hand side, draw a curve from the middle line to the top line at ‘B’. Continue this line, but curve down to the middle line at ‘C’, which then continues down to the bottom line at ‘D’, and then curves back up to the middle line at the right-hand side ‘A’. Connect the points at each ‘A’ line to the seam allowance lines.
You now have your sleeve pattern. Cut it out, join along the long ends and then set it into the main body. Make sure it can move properly and that it sits properly in the body part of the jacket.
Now you get to fiddle with the collar. I usually make them in 4 pieces. This is one where it pays to cut the ends a bit longer so that you can get the sewing lines correct. This has always been the most tedious part of the whole exercise, take your time and you’ll get it right.
Once you’re satisfied with the way the toile jacket fits, unpick all the seams on the toile, and label each piece for where it came from. The toile pieces for the front should be almost mirror images of each other, and so should the back pieces. Iron them flat and you now have your pattern pieces for marking out on the fabric you intend to use. You can use them as one of your foundation layers, or you can hold onto them as pattern pieces for future jackets, that choice is yours to make.
Putting it all together
Cut out each piece for your livery jacket, using the toile pattern pieces. I generally use 4 layers, so you’ll end up with 4 pieces for each pattern piece. Make sure you label the pieces as you go, otherwise you’ll lose track of which piece is what.
The simplest way to put all this together is as 2 shells. Try to make each shell roughly the same thickness as it makes it easier to sew. The order for putting the pieces together is body, then sleeves and then collar. Once you’ve done that you sew the 2 shells together.
First sew the two back pieces together. Then sew each front piece to the back piece, starting with the shoulder seam, then the side seam. Next, sew the sleeves up along the length and then set them into the armhole. Once both sleeves are done, put the collar pieces together and then sew in into the garment. Repeat for both shells.
Once both shells are done, you can now put them together. Typically, I sew them together and then turn it through. If you take this option, you need to leave a turn though gap at the bottom of the garment, and you don’t sew the sleeves together at all. Turn though the garment, fix the seams so it all sits neatly, then oversew the edge to hold it shut. You can now sew the ends of the sleeves closed as well. Oh and I’m assuming you’ll do all the necessary things like ironing seams flat, clipping curves etc.
Now it’s time to add your closure system. If you chose buttons or points go ahead and line them all up and make them happen. If you chose hooks and eyes, make sure the stitches holding the hooks and eyes in place go completely through the garment thickness, otherwise the shells will slide over each other and make an evil looking gap. Since the edges just butt up to each other with hooks and eyes, you also need to sew a placket behind the opening. Ours were about 10cm and folded and oversewn at the edges. In all of the closure systems, having each tie no more than about 6 or 7 cm is a good idea, since it helps prevent the opening from gapping.
You should now have a nice new comfy fencing jacket. There are lots of other ways you can make it look spiffy, so go ahead and have some fun doing so. The instructions on putting it together are really brief, if you have trouble ask one of the local sewing types for help. They can show you all the little tricks that’ll take me forever to write.
References
The following references all formed part of settling on design, providing clues on how to make the jackets etc. There is a huge wealth of information here. I highly recommend you take some time to have a look at some of it.
So what’s with the funny title??? It’s inspired by the effect using this first collection of drills in your training can do for your fencing ability. This is what I hope will be an ongoing collection of drills developed by members of the Guild. The first collection of drills were written by Provost Diccon Shorthand, for whom this regular feature will be named. I’ve seen the effect these drills had on members of the Politarchopolan Guild School. I’m a big believer in footwork as the foundation of all fencing, and I saw one particular Journeyman go from mediocre to outright nasty in the space of 3 months. When I did some digging into how one man could improve so fast, I found out Diccon had been hounding them all with footwork drills. So now onto the drills! – ibn Jelal.
Originally published in Punta Dritta November AS XXXVIII (2003)
Put random marks all around your pell 6 cm circles up and down your pell. Then, place the person to work around the pell hitting the circles with cuts and hits. This enables 360 degree training both in range and footwork. This can commence slow or be made fast. To enable variation you can make the circles different colours and call what colour you want hit and how.
Use a rope tied around the waist of the two opponents. The length is just enough for the two swords to be in range keeping the rope taut. It forces the opponents to move around to enable clean cuts and hits. It also forces clean technique to be used so sword does not tangle in rope. Particularly mean!
Originally published in Punta Dritta June/July AS XL (2005)
Have fencers face off within distance of each other: call one “Fencer A”; and one “Fencer B”.
Call paces, steps, compass steps, slope paces to one of the fencers; their partner responds to the movements to stay in line and range. For example: “Fencer A – three compass steps right”. Fencer B then matches movements to stay on line and in range.
This is an interesting exercise for movements and footwork. It can be made even more interesting (and useful) by making Fencer B wear earplugs, so that they cannot hear the commands and must respond only to the movements of their partner.
Originally published in Punta Dritta June/July AS XL (2005)
One of the most important skills we can teach our students is the ability to respond instantly to those minute openings that present themselves during a bout. The trick is to train them so that they react to an action made by the opponent using varied reaction drills. (Which, if you examine Diccon’s drills closely, all revolve around reacting to the movement of the opponent.)
1) Have the students form two lines, with each person in a line. Bring them on guard without weapons, and leading hands nearly touching palm upwards. Drape a glove over the hands. One row get designated as the leader, the other as the follower. Start with simple advances and retreats. The follower must try to keep the glove from falling by matching the steps taken by the leader. The instructor calls “CHANGE” at random intervals and the positions reverse, ie the leader is now the follower and vice versa. Keep a close eye on the paces taken, ensuring everyone steps cleanly and crisply. Slow pairs down if they get sloppy. As students progress you can add in crossover steps to the allowed range of steps.
2) Working in pairs, have one person hold the glove, while their partner holds their hand open in a C shape just below the glove, ready to catch it when dropped. Drop the glove at random intervals without warning – the catcher must catch the glove. Repeat five times with both hands catching, then swap roles and repeat. Repeat the exercise, but this time with the catcher on guard, such that they have to extend their arm to catch the glove.
You can also repeat again with the catcher set to lunge to make the catch and lastly to step-lunge to make the catch.
3) As above, except the glove is held to the side and the catcher is this time trying to hit the falling glove with a sword thrust. Start at close range where an arm extension is required, then repeat at lunge and step-lunge ranges.
According to the Lochac Rapier Combat Rules, rapier combat in Lochac “is intended to re-create the styles of the fifteenth and sixteenth centuries.” This is a very long period of time to try to cover in any discussion of rapier garb, so in this presentation I will be concentrating on the period in which the rapier was having what has been called its “Golden Age“- the sixteenth century, and only such clothing that is adaptable for SCA rapier fighting. I will look firstly at what was being worn then by both men and women, and then at ways in which the Society’s safety requirements can be easily, practically and accurately implemented. I will also suggest commercial patterns for your clothes
When I first began researching this topic in both period manuals and modern sources I thought I would perhaps find at a few references to what was being worn in the sixteenth century during rapier play, whether serious or not so serious. I was wrong. There is very little attention paid to clothing in any of the period sources that I looked at, and almost none in the modern sources. What I was able to glean came from passing reference, and diagrams in the period manuals.
Figure 1 – Renaissance Lady and Gentleman, 1593
Overwhelmingly, what is mentioned in texts or displayed in art is the wearing of a full suit of contemporary clothing. There is little mention of combatants fighting in just their shirts. I found only one reference to it, and that not even sourced, so I could not judge how accurate it was. The author said only “they no longer fought in armour, but in their shirts.” This was said in the context of relating a story about an illegal duel in the woods. (Hutton, p70) I have learned during my costume studies that the shirt was considered a item of underwear, and so it is not likely that men would have worn just a shirt outside the confines of their private home, and then only in the presence of only the closest of family members.
Clothing For Men
“…..the very butcher of a silk button…” In describing Tybalt in Romeo and Juliet, Shakespeare gives as a very clear mental picture of the atrocities committed upon silk-covered buttons, and In Shakespeare’s own time, it was Rocco, an Italian fencing master who said he could “hit any English man with a thrust, just upon any button in his doublet“. Let’s take a look at the clothing worn by men in the sixteenth century.(Lane, p67)
Figure 2 – Italian Gentleman, 1525Figure 3 – Antonio Moroni, Bergamo: Portrait of Gian Gerolamo Grumelli, 1560
1. Shirt
Considered an under garment, in art the shirt is not usually seen worn alone, except in depictions of peasants in the fields. All the extant shirts I’ve looked at were made of linen, some embroidered, some not.
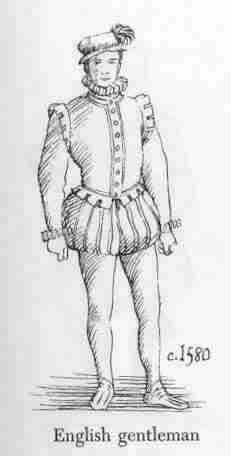
2. Doublet
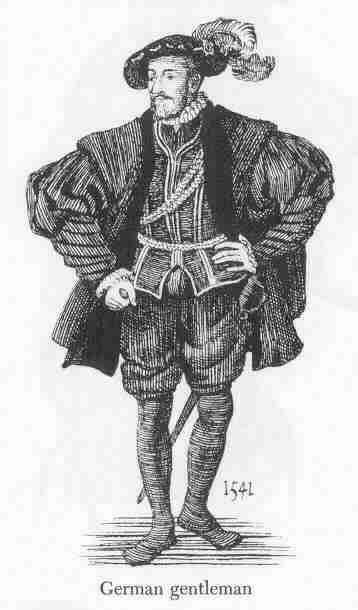
The doublet varied only a little during the course of the sixteenth century. It was usually a close-fitting garment, buttoned in front, with long or short skirt or short tabs usually, but sometimes without. Earlier in the century doublets with looser sleeves and longer skirts are seen, as in the “Italian gentleman” on the previous page. All of the doublets I have seen have a neck band, or collar. They were made from fashionable fabrics – brocade, velvet, plain silks – and also leather. In the case of the upper middle class, wool was also used. Most doublets were comprised of two or three layers of fabric.
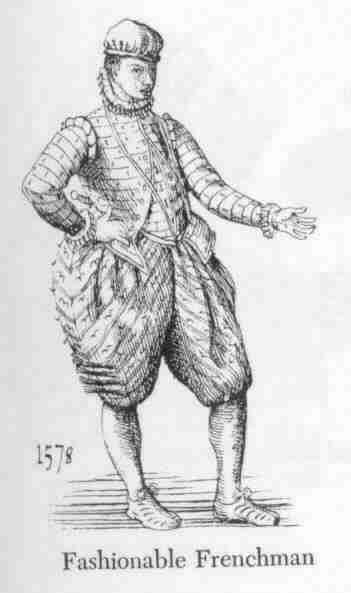
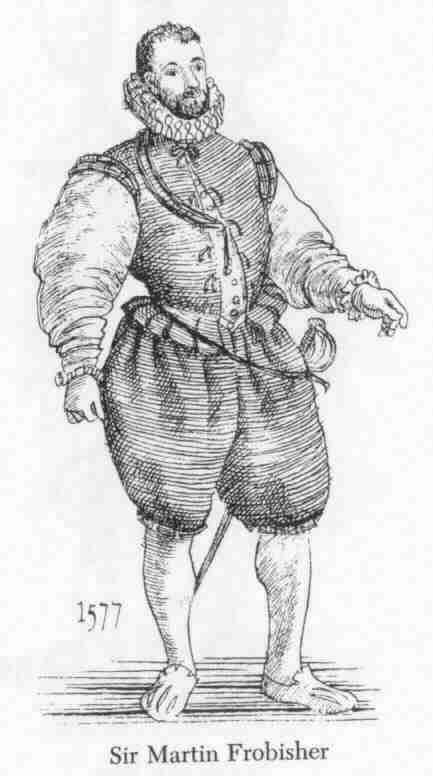
3. Trunk-Hose
There were paned or unpaned “slops”, which came in lengths that varied from just covering the backside, mid thigh or just above the knee, or “venetians”. or even pluderhosen. Unpaned “slops” were usually padded and stood away from the body, but paned could be closer fitting. Venetians were just below knee length, very loose fitting breeches. Waist to ankle length pants were not worn in Western Europe in the sixteenth century.
4. Hose Or Nether-Stocks
The covering for the lower half of the leg, these were usually fastened by means of garters (ribbons) tied around the leg below the knee, occasionally both above and below the knee. Sometimes no method of fastening can be seen, and the hose disappears beneath the hem of the Venetians. In some cases full-length hose were worn beneath slops.
5. Jerkin
Sometimes to the doublet was added another doublet-like garment, usually sleeveless. It was worn over the doublet.
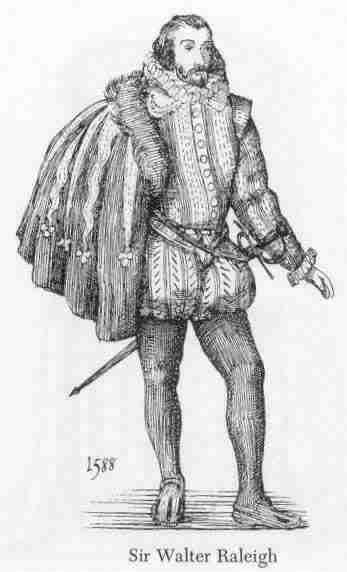
6. Finishing Off And Accessories
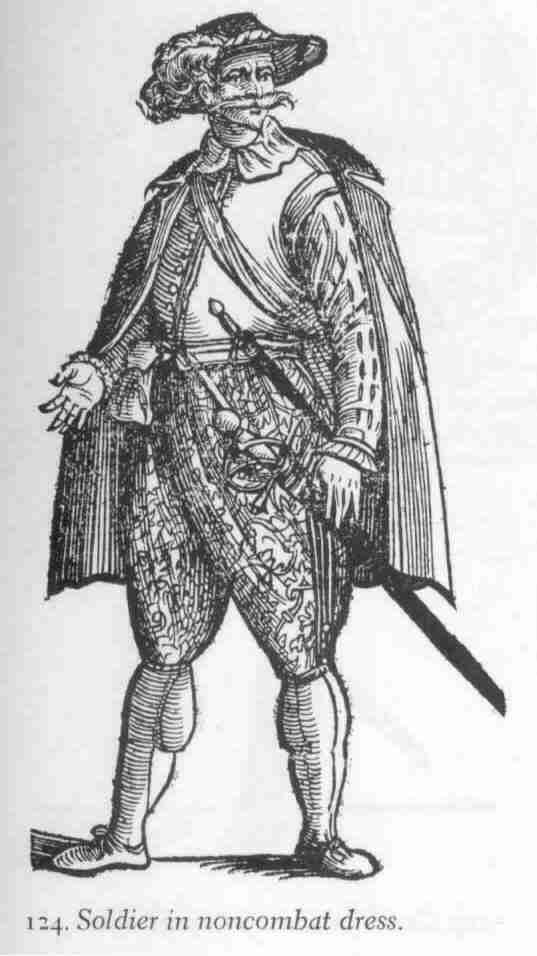
Shoes, not boots, are most often seen in period portraits. These could be made from very elaborate materials such as velvet, but were also made of leather. Boots are known of, but seemed to have been confined to those who spent time on a horse. Of course no gentleman would be completely outfitted without his rapier. But next to that the most important accessories were a suitable cloak, or cape, and a flat-cap or bonnet. Of course you do not need to wear these when fighting, but they do make for a spiffy outfit.
Clothing For Women
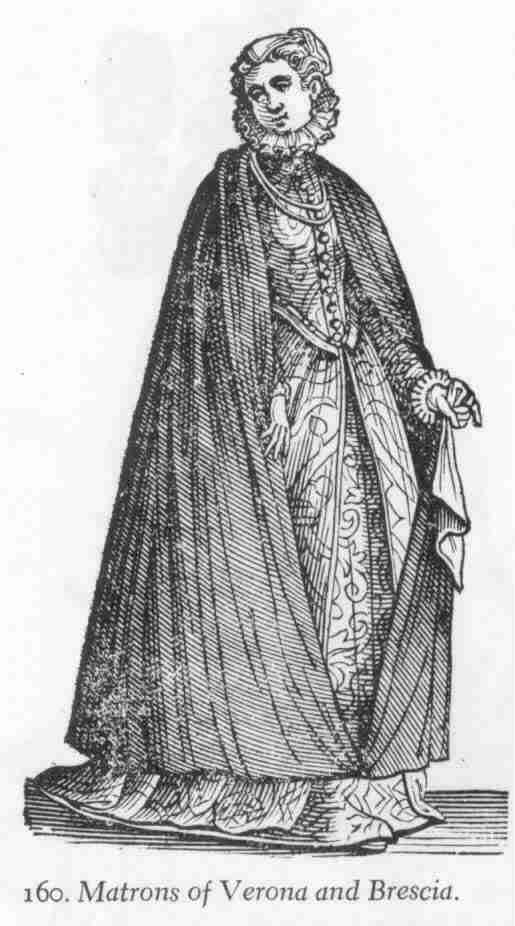
I have not found anything specifically regarding female rapier fighters in period, nor anything about what kinds of clothes they wore. But we shall look at women’s clothing of the sixteenth century, and see what styles can be best adapted for rapier fighting garb. The typical outfit for the sixteenth century generally consisted of a shift, gown and sometimes over-gown worn outdoors. There is no definitive proof of when separate skirt and bodice combination was first introduced. (Image at left: )
Figure 4 – Antonio Moroni, Bergamo: Portrait of Angelica Agliardi di Nicolinis, 1565
1. Shift Or Smock (Also Known As Chemise)
This, like the shirt for a man, was seen as underwear, and all extant garments I have looked at were made from linen. It is not as uncommon as it is for men, for ladies to be portrayed in period art with their gown sleeves removed, revealing the shift sleeves beneath, although it is much more common in the art of Italy. One thing I have noticed is that shift sleeves are allowed to show only in portraits of of ladies depicted in an informal situation – at home with family and friends usually. Sometimes lady musicians tie their shift sleeves to their arms with ribbons to be better able to play their instruments. Often courtesans are depicted not only in their shift sleeves, but with those sleeves rolled up to reveal bare forearms – very risque!
2. “Pair Of Bodies” Or Corset
There are few extant examples, but pairs of bodies, or corsets, are known to have been worn in the sixteenth century, and there is an extant example in the Bayerisches Nationalmuseum, Munich.
3. Petticoat Bodies Or Kirtle
This was a simple bodice with attached skirt, usually worn as an under-gown. It was also known as a kirtle. Kirtles could be fitted at the waist with a seam, or A-line (hanging from the shoulders).
4. Gown
This varied so greatly from country to country, and even city to city, that it would be outside the scope of this class to deal with them all. Instead I will concentrate on the style that perhaps is more suited to our society’s safety requirements – the most important in this context being the covering of the chest up to and including the neck. The square-neckline style of gown offers no protection in this area, but the doublet or doublet gown does.
Phillip Stubbes in his book “The Anatomie of Abuses”, 1583, said “the Women also there have dublets & Jerkins, as men have heer, buttoned up the brest, and made with wings, welts, and pinions on the shoulder points, as mans apparel is for all the world, and though this be a kinde of attire appropriate onely to man, yet they blush not to wear it…“
The doublet-style bodice is also seen in the art of Spain and Italy. In some cases it appears that a separate doublet was worn over a kirtle or petticoat bodies but in others a skirt was attached to a doublet-style bodice to create a doublet gown – this appears most often to have been an over gown, worn over another, simpler gown.
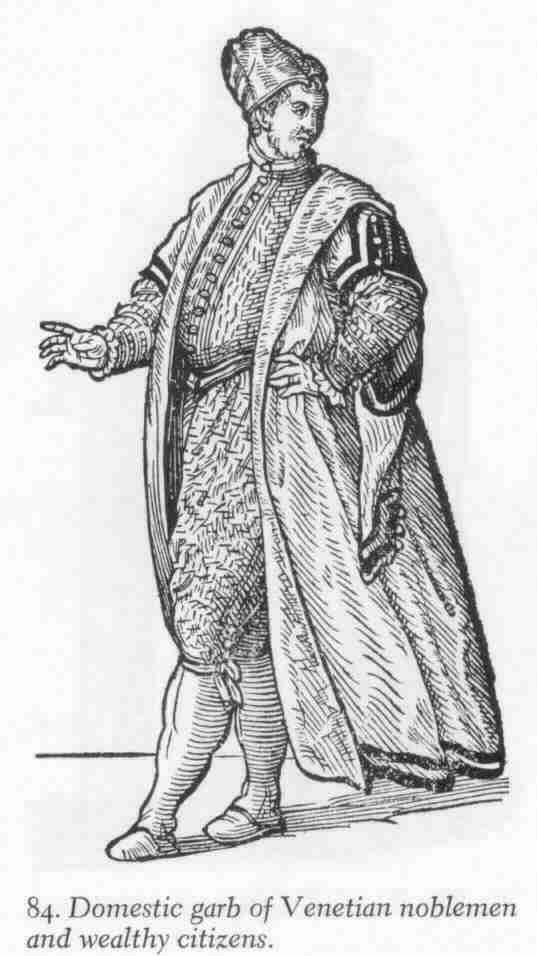
5. Over-Gown
The loose gown, or Ropa, was a Spanish garment that became popular in England and Italy. Some are loose from shoulders to floor, others have a false back that creates a semi-fitted garment. It was usually worn over a gown, kirtle or petticoat-bodies, but can be worn alone over the shift if you so wish.
6. Finishing Off And Accessories
Shoes are not usually visible in period portraiture, but in many cases they were similar in style to those of the men. Simple canvas Mary-Jane style shoes can be effective. A flat-cap can be a spiffy addition for wearing when you’re not fighting.
The safety requirements place specific demands upon our choice of clothing. In terms of layers of fabric, you must have abrasion resistant material (such as one layer of heavy poplin cloth, for example) covering your legs and the lower two-thirds to three-quarters of your arms, and puncture resistant material (such as four layers of abrasion resistant fabric, or one of 2mm leather) on your torso (including groin, upper arms and armpits). This layering can be hot, but needn’t be too much so, and with appropriate choices of fabric can also be practical and attractive to wear. It is worth mentioning that on the occasion of rapier combat in cold or wet weather, extra layers help to keep the muscles warm and flexible. This is just as important as keeping cool in warm weather. The most important thing in reducing the heat factor, is to use 100% natural fibre fabric wherever possible. Polyester retains heat close to the body, especially if there are several layers of it. Natural fibres – linen, wool, cotton and silk – breathe. Rayon is also a good fibre – while it is artificial in its manufacture, it is made from natural polymers – usually wood pulp – and it breathes well.
Note: Where a T-shirt is indicated as a layer in the following sections, that T-shirt must be made from a woven or very tightly knit material. Most knit T-shirt materials are not acceptable, due to poor puncture resistance. If in doubt, have the proposed materials punch tested before construction.
Some Possible Combat-Legal Clothing Layers For A Man
1 – Torso
1. A Shirt of heavy poplin cloth, or similar, plus a long-sleeved doublet made from two layers of heavy poplin cloth or similar, plus a short-sleeved jerkin made from one or two layers of heavy poplin cloth or similar.
Shirt = 1 layer, doublet = 2 layers, jerkin = 1 or 2 layers, for a total of the minimum of four layers, or five.
2. A Shirt of heavy poplin cloth, or similar, plus a doublet made from either three layers of heavy poplin cloth or similar, or 2mm leather. It is not necessary for the doublet sleeves to be completely made of three layers of fabric, but the top third of the arm MUST have a total coverage of four layers of heavy poplin fabric or similar, so two of the three sleeve layers could cover just the top third of the arm.
Shirt =1 layer, doublet = 3 layers, for a total of the minimum of four layers.
3. A Shirt of heavy poplin cloth, or similar, plus a short-sleeved jerkin made from three layers of heavy poplin fabric or similar, or one of 2mm leather.
Shirt = 1 layer, doublet or jerkin = 3 layers, for the minimum of four layers.
4. A modern close-fitting T-shirt made from one layer of abrasion-resistant fabric (avoid polyester if possible), plus a shirt of heavy poplin cloth, or similar, plus a short-sleeved doublet made from two layers of heavy poplin fabric or similar, or one of 2mm leather. This combination may be cooler in the torso and may be the best choice for warm weather.
T-shirt = 1 layer, Shirt = 1 layer, doublet = 2 layers, for the minimum of four layers.
NOTE: Suitable fabrics for the doublet include 2mm leather, cotton velveteen (very spiffy and relatively inexpensive!), tightly woven wool, or (less accurate for period outer wear) linen or cotton drill. It is important that the groin be covered by puncture resistant material (ie, four layers of abrasion resistant material) and this could be incorporated into the doublet skirts, which would need to be fastened together in front.
2. Legs
Venetians or slops made from at least one layer of heavy poplin cloth or similar, boots or hose to cover the lower legs. If groin-covering doublet skirt are not used it is important to ensure that the groin is protected by the required puncture resistant material. This can be achieved by wearing two pairs of close-fitting underwear as well as the venetians / slops of the required thickness (in the groin area only).
Some Possible Combat-Legal Clothing Layers For A Woman
Wearing male clothing is a valid option, and no woman should feel she should not or could not wear male attire to fence in.
1. Modern closely-fitting T-shirt, plus high-necked shift of heavy poplin cloth or similar, plus a sleeveless “petticoat bodies” or kirtle made of one layer of heavy poplin cloth or similar, plus a doublet-style over gown made of two layers of abrasion resistant fabric in the bodice and sleeves.
T-shirt = 1 layer, shift = 1 layer, kirtle = 1 layer, doublet = 2 layers, for five layers in chest, back and upper arms, but four layers elsewhere on the torso. This outfit has three layers in the skirts, so would be best suited for cold / wet weather. The outer layer of skirts could be hitched up out of the way, if need be, and should not be so long as to cause a tripping hazard.
2. Shift of heavy poplin cloth or similar, plus a doublet made of three layers of heavy poplin fabric or similar. It is not necessary for the doublet sleeves to be completely made of three layers of fabric, but the top third of the arm MUST have a total coverage of four layers of heavy poplin fabric or similar, or one of 2mm leather, so two of the three sleeve layers could cover just the top third of the arm. Worn with separate skirt which has the top front (groin covering) section lined with one layer of abrasion resistant material, plus wear an extra layer of underwear of ample coverage.
Shift= 1 layer, doublet = 3 layers, for the minimum of four layers on torso, skirt = 2 layers, 2 pairs of undies = 2 layers, for the minimum of four covering the groin.
3. Modern close-fitting short-sleeved T-shirt, plus long-sleeved shift, plus short-sleeved doublet made from two layers of fabric. Worn with separate skirt, lined in the front section with one layer of abrasion-resistant fabric and worn with an extra pair of undies.
T-shirt= 1 layer, shift = 1 layer, doublet = 2 layers, for the minimum of four layers.
NOTE: Suitable fabrics for the doublet bodice include 2mm leather, cotton velveteen (very spiffy and relatively inexpensive!), tightly-woven wool, or (less accurate for period outer wear) linen or cotton drill. It is important that the groin be covered by puncture resistant material (ie, four layers of abrasion resistant material) and this could be incorporated into the doublet skirts, or skirt.
NOTE: In both men’s and women’s clothing the required layers can be achieved by means of flat-lining, or flat-lining and bag-lining your garment. (For definitions see Appendix B.)
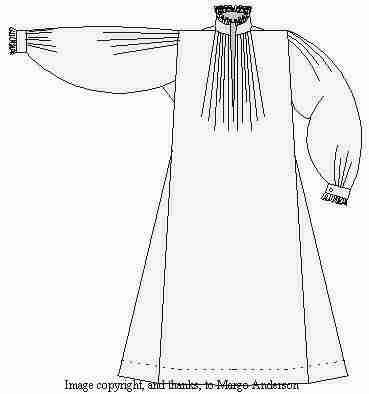
This style of shirt is not only accurate for most of the sixteenth century, it’s also fairly easy to make and doesn’t require much fabric. It consists of a large rectangle, folded lengthwise at the middle. There are under arm gussets, for ease of movement. A T-shaped cut is made along the centre line, and the resulting opening is gathered to a neck-band or collar. The sleeves are also made from large rectangles of fabric gathered into wrist bands. Alternatively, there is an extant shirt in the People’s Museum of Zadar in the former Yugoslavia, which is thought to be of Italian origin and from the late sixteenth century. It was made by without gussets or wrist bands, and instead has gores inserted into the top of the sleeves for shaping.
The Rest Of The Outfit
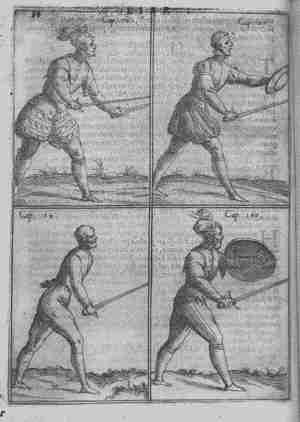
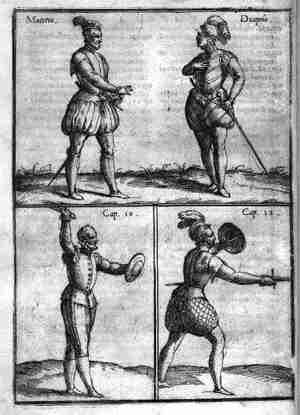
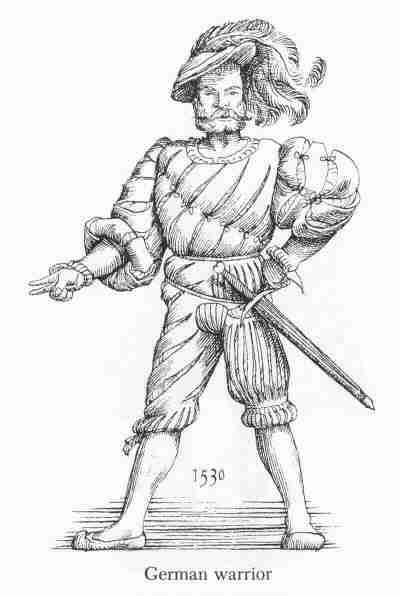
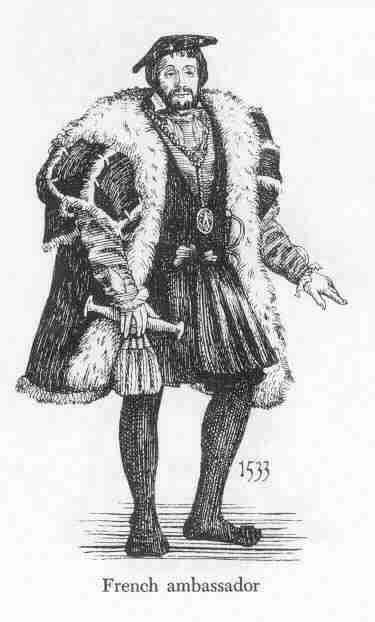
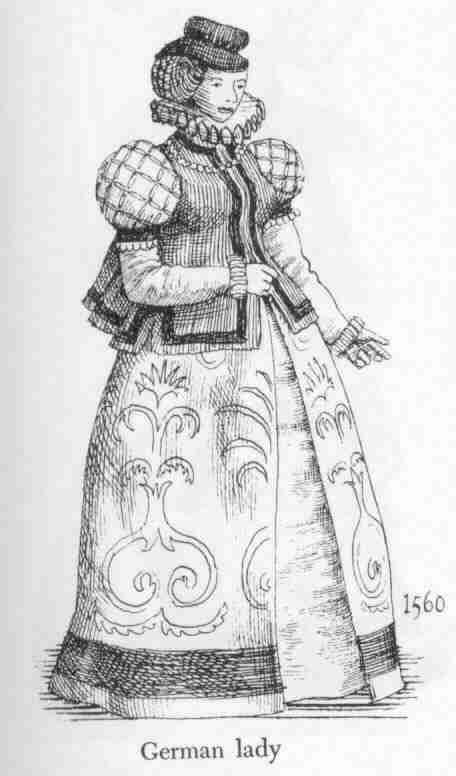
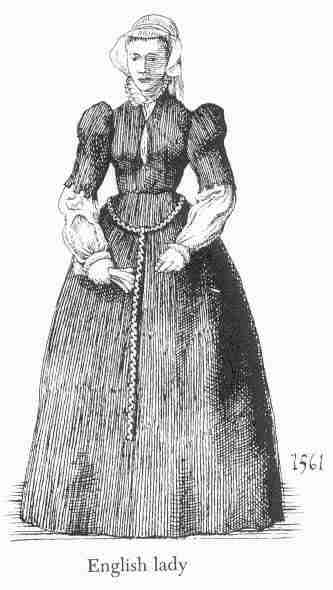
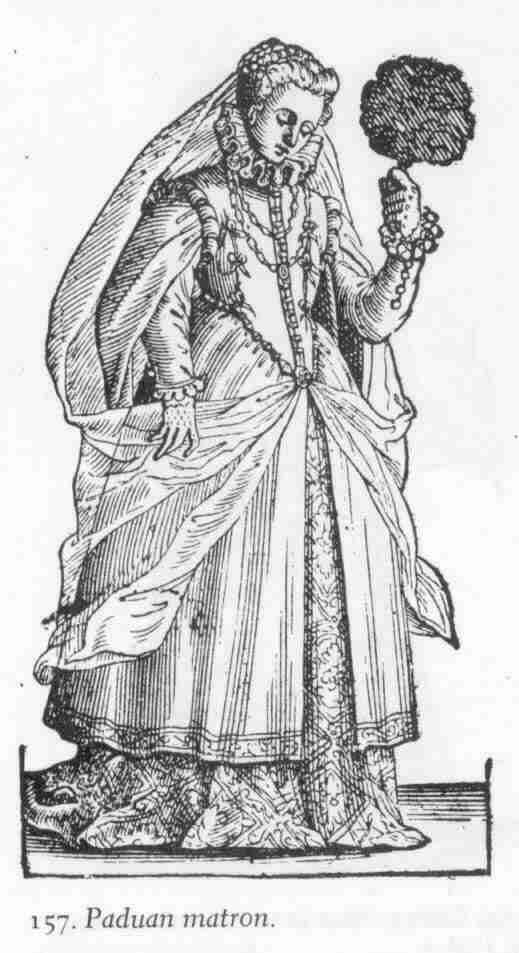
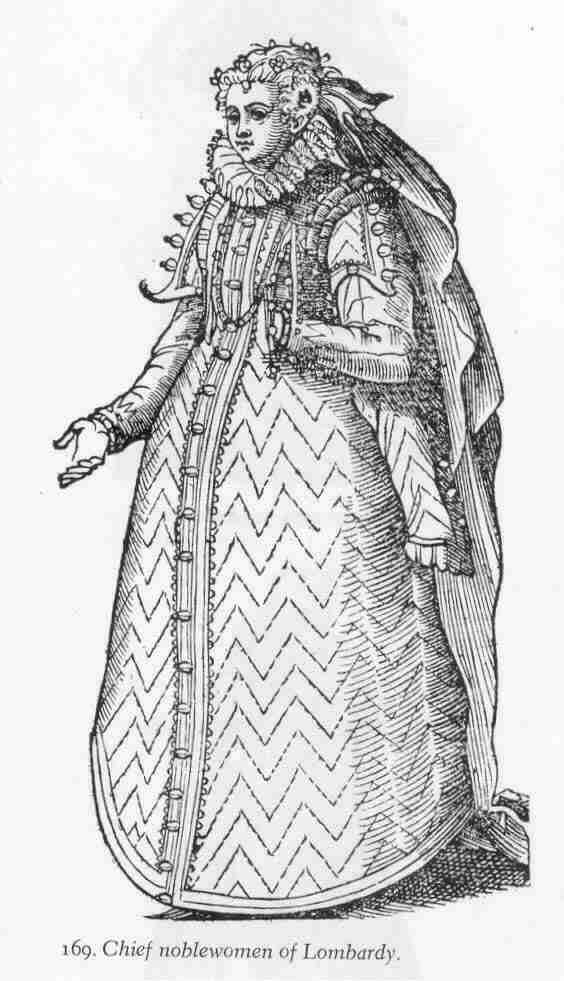
Figure 6 – Illustrations from Achille Marrozo “Arte dell’ Armi”, 1568Figure 7 – Illustrations from Achille Marrozo “Arte dell’ Armi”, 1568Figure 8 – Illustration from Douglas Gorsline’s “What People Wore: What People Wore: 1,800 Illustrations from Ancient Times to the Early Twentieth Century”, Dover Publications, 1980.Figure 9 – Illustration from Douglas Gorsline’s “What People Wore: What People Wore: 1,800 Illustrations from Ancient Times to the Early Twentieth Century”, Dover Publications, 1980.Figure 10 – Illustration from Douglas Gorsline’s “What People Wore: What People Wore: 1,800 Illustrations from Ancient Times to the Early Twentieth Century”, Dover Publications, 1980.Figure 11 – Illustration from Douglas Gorsline’s “What People Wore: What People Wore: 1,800 Illustrations from Ancient Times to the Early Twentieth Century”, Dover Publications, 1980.Figure 12 – Illustration from Douglas Gorsline’s “What People Wore: What People Wore: 1,800 Illustrations from Ancient Times to the Early Twentieth Century”, Dover Publications, 1980.Figure 13 – Illustration from Douglas Gorsline’s “What People Wore: What People Wore: 1,800 Illustrations from Ancient Times to the Early Twentieth Century”, Dover Publications, 1980.Figure 14 – Illustration from Douglas Gorsline’s “What People Wore: What People Wore: 1,800 Illustrations from Ancient Times to the Early Twentieth Century”, Dover Publications, 1980.Figure 15 – Illustration from Douglas Gorsline’s “What People Wore: What People Wore: 1,800 Illustrations from Ancient Times to the Early Twentieth Century”, Dover Publications, 1980.Figure 16 – Illustration from Douglas Gorsline’s “What People Wore: What People Wore: 1,800 Illustrations from Ancient Times to the Early Twentieth Century”, Dover Publications, 1980.Figure 17 – Illustration from Douglas Gorsline’s “What People Wore: What People Wore: 1,800 Illustrations from Ancient Times to the Early Twentieth Century”, Dover Publications, 1980.Figure 18 – Illustration from Douglas Gorsline’s “What People Wore: What People Wore: 1,800 Illustrations from Ancient Times to the Early Twentieth Century”, Dover Publications, 1980.Figure 19 – Illustration from Douglas Gorsline’s “What People Wore: What People Wore: 1,800 Illustrations from Ancient Times to the Early Twentieth Century”, Dover Publications, 1980.Figure 20 – Illustrations from “Vecellio’s Renaissance Costume Book: All 500 Woocut Illustrations from the Famous Sixteenth-Century Compendium of World Costume by Cesare Vecellio”. Dover Publications, 1977Figure 21 – Illustrations from “Vecellio’s Renaissance Costume Book: All 500 Woocut Illustrations from the Famous Sixteenth-Century Compendium of World Costume by Cesare Vecellio”. Dover Publications, 1977
2. Ladies
Shift
There existed square-neckline shifts, of course, but for rapier these would not help to cover your upper chest. The image below shows another style, much like the man’s shirt, worn in England, Spain and Italy. This affords the wearer more protection in the chest – the neck opening can be accurately made with ties to ensure the shift opening does not reveal any skin.
Figure 22 – Women’s Shift
The Rest Of The Outfit
Figure 23 – Illustration from Douglas Gorsline’s “What People Wore: What People Wore: 1,800 Illustrations from Ancient Times to the Early Twentieth Century”, Dover Publications, 1980.Figure 24 – Illustration from Douglas Gorsline’s “What People Wore: What People Wore: 1,800 Illustrations from Ancient Times to the Early Twentieth Century”, Dover Publications, 1980.Figure 25 – Illustration from Douglas Gorsline’s “What People Wore: What People Wore: 1,800 Illustrations from Ancient Times to the Early Twentieth Century”, Dover Publications, 1980.Figure 26 – Illustration from “Vecellio’s Renaissance Costume Book: All 500 Woocut Illustrations from the Famous Sixteenth-Century Compendium of World Costume by Cesare Vecellio”. Dover Publications, 1977Figure 27 – Illustration from “Vecellio’s Renaissance Costume Book: All 500 Woocut Illustrations from the Famous Sixteenth-Century Compendium of World Costume by Cesare Vecellio”. Dover Publications, 1977Figure 28 – Illustration from “Vecellio’s Renaissance Costume Book: All 500 Woocut Illustrations from the Famous Sixteenth-Century Compendium of World Costume by Cesare Vecellio”. Dover Publications, 1977
Appendix A: Lochac Rapier Combat Rules Pertaining To Clothing
4.2.2. General Defensive Equipment Requirements
4.2.2.1 No skin shall be bared. There shall be sufficient overlap between separate pieces of protective clothing, regardless of the combatant’s stance or movements, that the minimum protection for that body area be preserved.
4.2.5. Torso and Other Incapacitating Zones
4.2.5.1 The entire torso (the chest, back, abdomen, groin and sides up to and including the armpits) must be covered with puncture-resistant material.
4.2.5.2. Acceptable minimum armpit coverage is provided by a triangle of puncture-resistant material extending from the armpit seam, covering the lower half of the sleeve at the seam, and extending down the inner / under arm, one-third the distance to the combatant’s elbow.
4.2.6 Arms and Legs
4.2.6.1. Gloves made of abrasion resistant material shall protect hands and overlap any sleeve openings. Boots, shoes, or sandals, comprised of at least abrasion resistant material shall protect the feet.
4.2.6.2. Abrasion resistant material is required on arms (save as noted for armpits), legs, and any area not otherwise mentioned in these rules.
“Flat lining is also called underlining. Flat lining allows you to mark the inside of the garment without its showing, to attach bone casings and other notions, and strengthens the garment. It is useful for changing an insubstantial fabric of the right colour and pattern into one with the right drape and heaviness.” – www.directcon.net/wander/tech.htm
“Flat lining is sewing with the lining flat against the inside of the outer fabric, at the same time. The seams show inside this way. Victorian bodices are often flat lined, and the raw edges are neatly finished on the inside.” – www.alleycatscratch.com/lotr/makingem/Defintions.htm
Bag-Lining
“Sew around a hem (and possibly the sides), right sides together, one of the fashion fabric and one of the lining. Turn inside out. Press carefully. The remaining seam can be treated as one, or the outside can be machine stitched and the lining side tucked under and closed.” – www.alleycatscratch.com/lotr/makingem/Defintions.htm
Figure 29 – Image from George Cameron Stone’s A Glossary of the Construction, Decoration and Use of Arms and Armor in All Countries and All Times; Dover Publications New York, 1999
For Information And Images On The Art Of Defence Or Military Rapier, Primary Sources
De Gheyn, Jacob; The Exercise of Armes – all 117 Engravings from the Classic 17th-Century Manual (Facsimile), Dover, New York, 1999
Jackson, James L; Three Elizabethan Fencing Manuals (Facsimile), Scholars’ Facsimiles & Reprints, New York, 1997 For Information And Images On The Art Of Defence, Secondary Sources
Gaugler, William M; The History of Fencing – Foundations of Modern European Swordplay; Laureate Press, 1998
Hutton, Alfred; The Sword and The Centuries, Greenhill Books, 2003
Lane, Richard; Swashbuckling – A Step by Step Guide to the Art of Stage Combat and Theatrical Swordplay; Limelight Editions, 1999
Turner, Craig and Soper, Tony; Methods and Practice of Elizabethan Swordplay, Southern Illinois University Press, 1990
For Images Of Clothing Within Period
de Marinis, Fabrizio (ed); Velvet- History, Techniques, Fashions, Idea Books, 1994
Gorsline, Douglas; What People Wore – 1,800 Illustrations from Ancient Times to the Early Twentieth Century, Dover, 1980
Perlingieri, Ilya Sandra; Sofonisba Anguissola – The First Great Woman Artist of the Renaissance, Rizzoli, New York, 1992
Schneider, Norbert; The Art of The Portrait – Masterpieces of European Portrait Painting 1420-1670, Taschen, 1999
Vecellio, Cesare; Vecellio’s Renaissance Costume Book – all 500 Woodcut Illustrations from the Famous Sixteenth- Century Compendium of World Costume (Facsimile), Dover, 1977
Originally published in Punta Dritta November AS XXXVIII (2003) Republished in Punta Dritta July 2007 ASXLII (2007)
This isn’t “The Gospel According To The Guild of Defence”, but the thoughts of two Guildmasters, Silfren and ibn Jelal, who played the first prizes in Lochac and have examined many since.
We put these thoughts forward and invite commentary from all.
The Purpose Of Playing The Prize
The Guild of Defence is devoted to research into and teaching of period martial arts.
The playing of the prize is a way in which we measure people’s progress in the art of defence, their competency in the use of their weapons and understanding and use of period techniques.
The requirement for ability and accuracy increases as the Guild member goes through the ranks of the guild, with the upper ranks also required to be actively teaching and studying period styles.
The prize is not a competition to see who can land the most touches, it is an examination of the candidate’s ability. Examiners present problems to the candidate and give them opportunities to show different techniques in solving those problems.
The Differences Between Ranks
The ideal candidate will have a range of attacks and defences, rather than a single stance or movement of the blade that works for them. They will have a range of footwork, and can show they know when to use each direction and style of pace, even if they use some more than others. They will attack in different lines, and marry those attacks with correct footwork. They will use different defences depending on the opponent’s attack, and will demonstrate an understanding of how to use distance, blade work, voiding, and both hands (empty or no) as part of their response.
There are no hard and fast differences between the ranks. However there are some general concepts which can help us determine performance. Those concepts are ability, which includes speed and efficiency, understanding of actions, and complexity of the fencing phrases. The following examples should give you an idea of how those concepts are applied.
Each rank will have a different level of ability in the same weapon, a Journeyman playing a sword and buckler prize should be a better sword and buckler fighter than a Free Scholar. The higher the rank, the faster the speed – not just physical speed, but speed of reaction, speed of understanding. A Provost will solve problems more quickly than a Journeyman who will solve them faster than a Free Scholar will. The higher the rank, the quicker they should be to see an opening and take advantage of it. Physical speed is athleticism, the Guild is more interested in speed of understanding, and in the level of timing, as well as the efficiency of their actions. The candidates motion should increase in efficiency as they progress through the ranks, which will result in an apparent increase of speed. It’s a continuum from the choppy static fight of the Free Scholar, through to flowing seemingly effortless fight of the Guildmaster.
Given something they have never seen before, a Free Scholar would stand back and be unsure of what to do and perhaps be tentative in trying what they know against it. A Journeyman would think “That’s different!” but go in and attack it with their best shot. A Provost would probe the new stance or defence carefully, noting reactions. A Guildmaster would look at it, note the possibilities inherent in it, and then manipulate the opponent to expose the weak spots they’ve seen.
A Free Scholar will use simple attacks, probably only one try per pass. A good one will not stop when the attack has failed, but turn it into another attack, salvaging a missed thrust with a cut. They will be reasonably balanced in their movements, seldom over stepping or over-parrying. They will show competence in the weapons form, including some clear understanding of period style, use of both hands, and some period style footwork. A modern epeeist may score many touches, but would not be suitable as a Free Scholar of the Guild.
A Journeyman will be making two or three attacks, stringing them together, before they retire out of distance. They’ll understand ripostes and the rhythm of attack and defence. They should be more settled and cleaner in their movements than the Free Scholar, have a good understanding of range, be more economical in their movements. They should be solidly competent in the use of the chosen weapons form, showing more understanding of how it was used in period, as well as body voids and good footwork.
Provosts will clearly use that attack and defence rhythm, but will control it more, and will be using attack by second intention, where the initial attack sets up the subsequent ones. They will be using timing well, landing their hits with intelligence more than with speed. The Provost is a teacher, and so must demonstrate good form in their movements. They should be well balanced all the time, upright, their footwork crisp and quick. They should look good, not wild or sloppy. Their blade work should be neat and accurate, economical and well timed. They should show a good understanding of one or more period styles, demonstrating the way the feet and hands work together, as well as many of the possibilities of each weapon they choose.
Guildmasters will do all a Provost does but more so, and will make it seem effortless, unfussed. They will look good in all their movements, and demonstrate a mastery of their weapons, showing several period styles and approaches to problems.
Considerations For When You Examine A Candidate
The examiners should collaborate to be sure the candidate is given every opportunity to demonstrate their ability, they should each concentrate on providing different openings and attacks and defences for the candidate to take advantage of. Their job is to provide an environment for the candidate to show what they can do, not what they can’t do. They should be sure to attack as well as wait to be attacked, examine the candidate at several distances, see what they do when confronted with different period style attacks or stances.
It is important to remind everyone involved on the day that this is an examination of style and ability, not a tournament where getting the touch is all that matters.
The maintainers of standards for each rank are the members of that rank. If Guildmasters and Provosts and a single Journeyman are testing a Journeymans’s prize, the Journeyman should have the final say, as to whether the candidate is their peer. It is natural for higher ranks to see more faults in a candidate than the lower ranks, however it’s the person of the rank being examined who will have a better feel for what is required at that rank. We do not expect skill comparable to a Provost at Free Scholar rank, and higher ranks should make an effort to moderate their expectations and actions to that of the rank being examined.
Considerations For The Candidate
Your job is to demonstrate your style and knowledge. You will be expected to show an understanding of offence and defence in a period style. The concept to remember here is depth and breadth of ability.
One of the sure-fire ways to fail a prize is to concentrate on winning each bout. When candidates have dropped into this mindset, they fall back on their old faithful actions, and have shown a very limited range of actions. What your examiners want to see is your diversity. Some bouts your examiners will give you opportunities to attack and in others they will push your defence.
The job of an examiner is to bring out your skill, which they will do by presenting problems. If you see an examiner presenting the blade, your first thought of making the bind is probably the correct one, as the examiner is most likely giving you an opportunity to show that action. They are giving you a chance to show how you deal with a threatening blade. It’s not a tournament, they want you to succeed and are not trying to sucker you into making the wrong action.
Another thing you should remember as candidate is to use the combination you’ve chosen. It’s no good selecting sword and buckler if you don’t use the buckler in your fencing. Your examiners want to see you trying to make hand offs, deflections and actions on the blade with the buckler, not just this lump of wood waving vaguely in the direction of the examiner.
Most of all, we want to see you having fun. This is an opportunity to fence for the sake of the art and style. It’s not a competition, and there’s no pressure on you to win. We want to see you try the stuff you think doesn’t work for you reliably, as well as the stuff you’re good at. This is the time to show what you know, not just what you know works for you.
Originally published in Punta Dritta January AS XXXV (2001), revised 16 May 2003
Introduction
These blades are based on the techniques developed by Edmund the Lame (See Edmund’s Original fibreglass rapier construction instructions) Due to my preference for a more edge defined blade than Edmund’s triangular cross section, the design here is a slightly modified version to give a diamond section blade. I also encountered problems with the tips being far too fragile, and hence use a thicker rod for the tips. Once these tips are firmly taped, the blade will flex through the whole end section, unlike Edmund’s design, where only the tip rods themselves flex. There’s no real advantage in either system; it’s just my particular preference in how they feel. If I can feel the blade bending I don’t push as hard, which may have contributed to the early high failure rate.
I also tried to achieve a period feel for the weapons, so the design gives a sword that balances around 23% of the total length, measured from the hilt. This is similar to period rapiers in the way they balance. If you’re interested in the dimensions of period weapons, have a look at Gregory Stauf’s article.
Oh, I’m in Australia, so for all you US people you’ll have to convert the measurements from Metric to Imperial. Basically, all you have to remember is 1 inch = 25.4 mm or 2.54 cm. The quick rough conversion is 30 cm = 12″.
Materials
6.25 mm (diameter) fibreglass rod
4.1 mm (diameter) fibreglass rod
3.5 mm (diameter) fibreglass rod
6 mm internal diameter rubber stopper
Fibreglass tape
Vinyl tape – silver / grey and coloured
Sandpaper, medium to fine grade
Hot melt glue
19 mm copper pipe, cut to 15 cm lengths
Epoxy glue e.g. Araldite
Epoxy putty e.g. Selley’s Knead-It
Pommel weight
Notes
Fibreglass rod is available from plastic / fibreglass manufacturers or from kite supply shops or from sailing supply stores but these are more expensive (retail vs wholesale). We’re fortunate in Sydney in that we have a company who manufactures pultruded fibreglass rod, which are used for sail battens. They also cut to size, so we don’t have to muck about with hacksaws etc to cut it.
I use soft rubber stoppers designed for chair legs. These are available from local hardware stores. A slightly larger internal diameter is OK. Make sure you get the smooth face ones (either flat or domed), some have a raised ring that acts like a percussion point when they hit, decidedly unpleasant. (Think hollow point bullets.) The dome-faced stoppers appear to last longer than the flat-faced stoppers.
Fibreglass tape is a plastic tape impregnated with fibreglass strands. Available at some hardware stores as a packing tape, or in good stationery supply stores, like Penfold’s. Comes in two basic widths, approximately 6 cm and 2 cm wide. The 2 cm stuff is really useful for initial taping / binding, and the wide stuff is what I use for covering and finishing the binding.
Vinyl tape is readily available here in hardware stores etc. The silver / grey tape is usually sold as vinyl duct tape (I’m told this is VERY different to US duct tape) and is about 6 cm wide. The coloured stuff is sold as electrical tape, and is about 2 cm wide.
Epoxy putty (ie Selley’s Knead-it) is a two part putty sold here for moulding repairs in woodwork and other various areas. I’ve found it extremely useful as it can be carved / shaped once hard, and binds extremely well. This makes an excellent cavity filler. If you use the hilt construction I’ve given, be prepared to just cut off any section you’ve used the putty on, it’s extremely difficult to remove from fibreglass rod.
For the pommel weight I use a cast bronze curtain rod finial, to fit 19 mm rod. They just happen to be the correct size for a counter-weight for fibreglass swords.
Equipment
Hacksaw with fine tooth blade
Pliers
Vice
Hot glue gun
Craft knife or scissors
Safety Instructions
If you are going to be cutting and finishing fibreglass then you need to use adequate eye, respiratory and skin protection while doing so. You will be generating a very fine fibreglass powder that you do not want to inhale or get in your eyes. Keeping it away from your skin is also a very good idea. Even if all you are doing is taping the bare rod, I suggest you still wear disposable gloves, as it can irritate your skin very quickly.
Calculations
Following are the formulae I use for calculating rod lengths. These are essentially the same calculations Edmund uses, except they’re adjusted for the longer tips used by my design.
R = total length of rapier in centimetres (inches) A = R – 20 cm (8″) B = R – 30 cm (12″) C = R – 37.5 cm (15″) D = 30 cm (12″) E = 25 cm (10″)
For the calculations I always assume a 15 cm (6″) handle.
A = length for 6.25 mm rod. You need one of them B = length for 4.1 mm side rods. You need two of them. C = length for 4.1 mm top rods. You need one of them. D = length for 3.5 mm tip rods. You need two of them. E = length for 4.1 mm quillon rods. You need two of them.
Note: when I first wrote this in 1999 I was using 4.1 mm tip rods. I have since moved to 3.5 mm tip rods, as I’m finding that the 4.1 mm can tend to S bend and hit hard just before failure, but the 3.5 mm rods do not. It’s not critical, just something to be aware of.
Blade Construction
Before commencing ensure that you have taken adequate safety precautions. Fibreglass dust and shavings is nasty stuff.
Cut your rods to the required lengths, as calculated above. A fine hacksaw blade is best for cutting the rod. Lightly sand the ends of each length to take the sharpness off the edges. This helps prevent the edge of the rod from cutting up your tape layers.
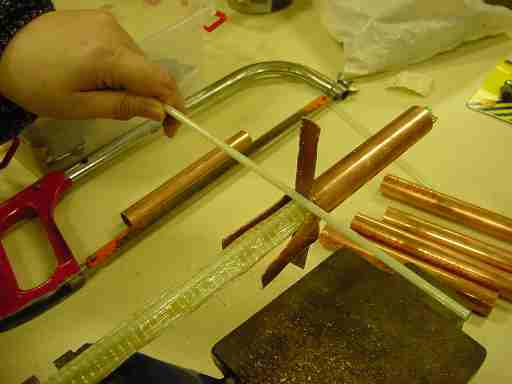
On a flat surface, butt your 6.25 mm rod (A) and the two 4.1 mm side rods (B) together. Bind together with short sections of your narrow fibreglass tape. Make sure the ends all line up at one end. I usually bind the two ends and the middle. The tape should not be right on the ends, but about 2 – 3 cm in from the end. Make sure the rods all lie flat on your bottom surface. Now glue the rods together using the hot glue, trying to keep the glue beads as even as possible. Try to avoid lumps, as this will make a wear point in your tape. Don’t panic if you get them, you can always sand or trim it back later. You should end up with a rod cross section like this:
Turn your blade over and place the top 4.1 mm rod (C) on top of the 6.25 mm rod. I usually find I have a nice channel from the hot glue that the top rod sits in quite nicely. Bind the rod to your glued rods using some more of your narrow fibreglass tape. Make sure all the rods are flush at one end. Now hot glue the top rod in place, following the same precautions. Don’t be too fussed with completely filling the gap with hot glue, you just need to stick the rods together. You should end up with a cross section that looks like this:
Now I usually wrap a strip of wide fibreglass tape around the forte section, stopping a centimetre or so just past where the top rod stops. Whether you spiral wrap, or do a longitudinal wrap is up to you, but my experience has been that a spiral wrap is overkill for taping this section.
Take your two 3.5 mm tip rods (D) bind them together at one end with narrow fibreglass tape. I usually wrap a strip around the end, and then another over the end to help prevent it punching through the rubber stopper. The loose ends are then bound to the 6.25 mm end of the forte, so that their ends butt up to the ends of the 4.1 mm side rods. Using the narrow fibreglass tape, bind in place with a strip at the end of the 6.25 mm rod, another about 2-3 cm from the ends of the tip rods, and lastly over the join area where the rods all butt together. Make sure the tip section remains flat and in line with the edge of the blade (side rods). The tip section can now be wrapped with wide fibreglass tape. I’ve found this works best if you spiral wrap, as it makes the tip section and forte end one flexible unit, and reduces breakage of the tip rods.
Push the rubber stopper over the end of the tip rods. Take a strip of narrow fibreglass tape and split it in half lengthwise. These strips are then taped over the rubber stopper in a cross pattern. The tape that runs down the side of the stopper is then bound down using 1 or 2 strips of fibreglass tape, which is wrapped around the side of the stopper, and just below the stopper. Repeat this with electrical tape, so that the fibreglass tape is covered.
The reason we tape it twice is because the fibre tape is great at holding them on, but gets brittle quickly in UV light, and loses it’s holding power. By covering the fibre tape with electrical tape, it protects the fibre tape from degradation. Electrical tape on it’s own doesn’t have the holding power to keep the tip in place.
Finally, wrap the blade with vinyl tape. Longitudinal wrapping is fine for this, but I’ve found it easier to do it in 2 or 3 sections. The vinyl tape should cover the bottom section of the electrical tape holding the rubber stopper in place. This really secures the stopper in place, and I’ve never had one come off. Some people also prefer to glue the stopper in place as well, but I’ve not found this necessary.
Your blade section is now complete. You can do all sorts of fancy things with it at this stage, but below is my usual hilting method.
Hilt Construction
The key to making a really good blade is having a very rigid handle section. The instructions here give a very rigid handle, that is relatively quick and simple to make.
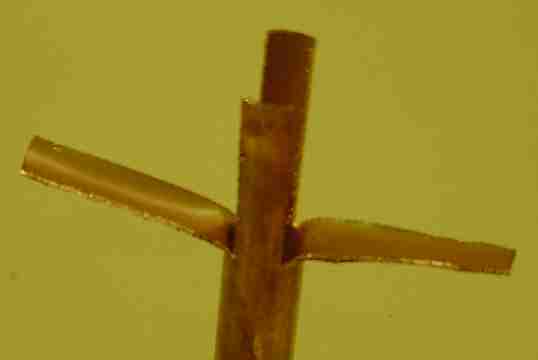
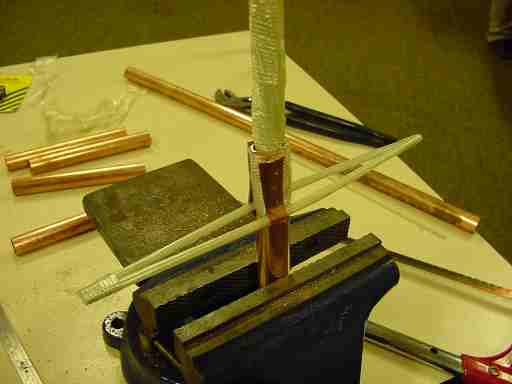
Firstly, cut your copper pipe to the right length, and then cut two slots in one end, of about 5 cm in length. This should quarter the end of the pipe, but it works best if you have one pair of tabs slightly wider than the other.
Bend the thinner tabs out to an angle of ~90°. Lightly file the cut edges to remove burrs, sharp edges and corners.
Using a pair of pliers, squeeze the wider tabs so that they start to curl around a tighter diameter. These tabs will grip around the side rods of your blade. Once you’ve got the approximate shape, insert the blade and crimp the wide tabs so that they tightly grip the side rods. Be careful you do not crush the side rods. Once crimped, secure with a strip of narrow fibreglass tape. You should now have a supporting tab projecting from each side of your blade.
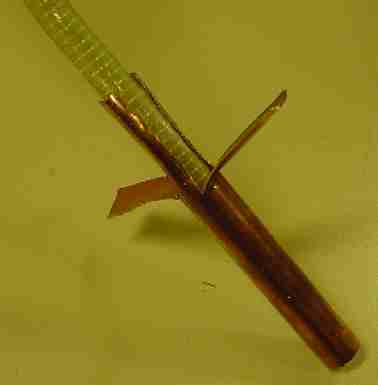
Take your quillon rods, and cover with a strip of fibreglass tape, as this helps prevent the rods being cut by your copper pipe during use. This is easiest if you lay out a strip the right length, adhesive side up, then line up your rod along the side of the tape and roll the rod over the tape, and the adhesive will cause it to wrap around the rod, without bubbling. Next tape both ends as you did for the blade tips, with narrow fibreglass tape. Slide the taped rods down the blade until it rests in the supporting tabs of the copper pipe. (If you are also trying to add a bell, you slide the rods and bell on as a unit. It’s tricky, but persevere, and take your time to get it right.)
Fold the supporting tabs over the rods to hold them in place. Secure the whole arrangement with a couple of lengths of narrow fibreglass tape. The tape should be in an X pattern over the cross section.
Cover the quillon lengths with some wide fibreglass tape, and then apply the rubber stoppers to the ends, and tape them on using the same taping method employed for the blade point. Finally, do a finishing taping with vinyl tape. I usually split the wide vinyl tape, to cross wrap the join section, and tape a strip over the quillons, securing the whole taping with a section of vinyl tape wrapped around the base of the blade, and wrapping a section of electrical tape around the top of the handle.
Prepare a blob of epoxy putty, and force this into the bottom of the handle, making sure the blade is centred inside the copper pipe. Clean off any excess and allow to set. Finally, glue the pommel weight onto the end of the handle with epoxy glue, and allow to set. Your new fibreglass rapier is now ready for use.
Acknowlegements
I’d like to thank Edmund the Lame for writing his original instructions, and answering my initial queries. The hilt construction pictures were taken by Silfren the Singer, who gets thanked for these, and for pushing me to write the instructions in the first place.
6mm (diameter) fibreglass rod (6mm is approx 1/4 inch, 25mm = 1 inch (approx))
4.5mm (diameter) fibreglass rod
3mm (diameter) fibreglass rod Fibreglass rod is available from plastic/fibreglass manufacturers in 6 metre (yard) lengths. Shorter lengths can be purchased (cut to length) from kite supply shops but these are more expensive (retail vs wholesale).
6mm rubber stopper We use soft rubber stoppers designed for chair legs. These are available from local hardware stores. A slightly larger internal diameter is OK.
Fibreglass tape This is a plastic tape impregnated with fibreglass strands. If you can get it, the cross hatch (#) patterned tape is better than the tape with the fibres going in a single direction. It blunts knife blades quickly and sticks to itself better than anything else. Available at some hardware stores.
Duct tape The normal US duct tape is not the same as that used in Australia; their\’s is reinforced/tearable tape which is banned for use in this method of constructing rapiers – These instructions assume a silver grey vinyl duct tape.
Electrical tape Colored plastic tape. We tend to use red or yellow. The purpose of the tape is to make the rubber stopper visible to the *marshal(s)* during combat, not your opponent, so any color acceptable to them will do. Available at hardware stores, super markets, garages etc etc.
Hot melt glue Your basic heat-it-and-it-melts craft glue.
Sandpaper Medium to fine grade. A single sheet should be more than enough.
Equipment
Safety Gear If you are going to be cutting and finishing fibreglass then you need to use adequate eye, respitory and skin protection while doing so. You will be generating a very fine fibreglass powder that you do not want to inhale or get in your eyes. Keeping it away from your skin is also a very good idea.
Craft Knife or Scissors. Available all sorts of places. Required to cut various lengths of tape. You can use a craft knife to cut fibreglass rod but it\’s not a good idea. A fine hacksaw blade works best.
Hilt/guard materials Some people use a small stainless steel bowl with holes punched in it for blade and quillons, some just use quillons. Some build up the grip with off cuts of rod and tape, wire, leather. Others use a piece of hollowed out dowl. My personal preference is for a pair of quillons, and a handle built up by wrapped tape.
Some Definitions
R = length of rapier (including hilt) in inches X = R – 7″ Y = R – 11″ Z = R – 15″
R = blade length + 4″ handle sinkage allowance. (adjust for sinkage allowance but anything less than 4″ doesn\’t give enough stability. – with your \’wrapped\’ handle version you\’d need to have the sinkage allowance almost the whole length of the handle so I can see how you came to your version of R. I allow an extra 1″ in the handle for lead counter weighting as I use a 5″ handle so R is Blade length + 4″)
X = R – 7″ (the length of the 3mm past the 6mm is ALWAYS 7″ – 8″ produces a tip that hits too light & is very whippy. 6″ produces a tip that hits harder but breaks much more often)
Y = R – 11″ (4″ is the \’sinkage\’ of the 3mm alongside the 6mm to give it enough grip & stability – longer is OK but wasteful & shorter doesn\’t give enough stability)
Z = R – 15″ (got this right but by default – the extra inch of the 4.5mm spine stiffener provides for additional rigidity in this section of the blade not necessary & probably undesirable as it takes some of the bend out of the last 1/3 of the blade on impact)
Construction
Before commencing ensure that you have taken adequate safety precautions.
You should not allow any exposed skin to come into contact with the fibreglass (rod or dust) and you should be wearing a filter mask to prevent inhalation of the dust particles. Eye protection should also be worn to prevent dust particles getting into your eyes.
Cut a length of 6mm rod X” long.
Cut 2 lengths of 4mm rod Y” long.
Cut a length of 4mm rod Z” long.
Cut 2 lengths of 3mm rod 12″ long.
(A fine hacksaw blade is best for cutting the rod.)
Lightly sand the ends of each length to create a bevelled edge. This helps prevent the edge of the rod from cutting through the tape later. Cut a few short lengths of fibreglass tape and split them length wise into strips about 1/3″ to 1/2″ wide. Stick them somewhere handy.
Take the two Y” long pieces of 4mm rod and lay one on either side of the 6mm rod. Tack them together using two or three lengths of the pre-cut tape. The three pieces of rod need to butte tightly against one another. You should now have a fairly flat cross sectioned blade. Run a thin trickle of glue down the grooves. Try and avoid any “lumps” in the glue as these will form hard points that will break through the tape.
Take the third length of 4mm rod and lay it on top of the 6mm rod. Tack it in place using the pre-cut tape. You should now have something roughly triangular in cross-section – o oOo Run hot melt glue down the gaps/grooves. Again try and avoid any lumps. If possible try and flatten the glue while it is still warm (be careful not to burn yourself) so that you get a more triangular cross section. Place a large drop of glue at the end of the Z” length of 4mm rod to create a slope. This will make the transition from triangular cross section to flat cross section easier.
Wrap this transition point in 2 to 3 layers of fibreglass tape. Wrap a small piece of fibreglass tape around the protruding 6mm rod (tip end). Leaving the Hilt section (tang) bare, wrap the blade in fibreglass tape, using a spiral wrap. Leave the ends of the two (Y length) 4mm rods bare. Take one of the 3mm lengths and lay it next to the exposed 6mm rod, so that the tip is butted against the 4mm. Tack it in place using the pre-cut tape. Do the same on the other side with the second 3mm length. Wrap the join in several layers (5-6) of fibre-glass tape.
Bind the two pieces of 3mm rod together with fibreglass tape to form a point. Allow a small overlap (1/8″) of tape to protrude beyond the edge of the 3mm rods. Fold this down to form a pad of tape at the end of the blade. This is to help prevent the fibreglass rod from cutting through the rubber stopper.
Partially fill (2/3 – 3/4) the rubber stopper with glue and then push the point of the blade in (about half way). Wipe away any excess glue, again being careful not to burn yourself.
Bind the rubber stopper to the end of the rapier using fibreglass tape. Cover the tip (stopper) in electrical tape.
Now you have to decide on the type of hilt/guard you want. Basic quillons are easiest. A simple cup hilt with quillons is not too hard either. See below.
Wrap the blade in duct tape using a spiral wrap. Stop just below the point where the 3mm rod joins the 4mm rod. Starting just above this junction continue wrapping to the tip. Wrap the junction at 90 degrees to the blade. The reason for stopping/re-starting the wrap like this is that most of the flexibility is in the 3mm tip and this is where the blade is most likely to break. The tip is designed to be replaceable. By stopping the main wrap just below the start of the tip it makes replacement/repair easier.
The completed blade should very easily bend 90+ degrees along the flat. The forte is nearly rigid and can be used to parry quite effectively. The blades tend to be very light, and therefore quick. The highly flexible tip means that “heavy” shots rarely leave a bruise and the tip tends to break before any real damage is done. When coming up against a novice (trainee) fencer I would much rather see them using one of these than a schlager.
Quillons
Take a length of 6mm rod and cut it to the required length. Cut a length of 4mm rod 1″ shorter than the 6mm rod. Mark the centre point of each piece. Lay the two pieces side by side, so that the centre points are together. Bind the two pieces together at one end. Position the quillons so that the centre point is over the blade. The 6mm rod should be against the flat side of the blade, the 4mm rod should be against the V shaped side.
Now bind the other end of the quillon. This should lightly clamp it in place. Using fibreglass tape, proceed to bind the quillons as tightly as possible to the blade. Hot melt glue “pumped” into the cavity helps strengthen this join, and to balance the weapon by adding weight to the hilt. I usually place a rubber stopper over each end as a safety feature (the quillons *do* come in contact with yourself and your opponent on occassion – I prefer to soften the blow a little if possible).
Complete the hilt by either building it up to a comfortable diameter with tape (or leather or wire …). If you wish to you can hollow out pieces of dowel, modify tool handles (eg Rasp) etc and use these. In either case the fibreglass should be totally covered.
Cup Hilt
Obtain a small stainless steel bowl roughly 6″ in diameter. Try army surplus, discount or camping stores.
Punch holes in the sides of the bowl for the quillons (6mm). Punch a triangular hole in the base of the bowl for the blade to pass through. Ensure that the alignment of the blade/quillon holes is correct. Try and ensure that there are no sharp edges where the blade passes throught the hilt. Padding this area with leather or extra tape is a good idea.
Cut two pieces of 6mm rod (one for each quillon). Mount a rubber stopper on the end of each and wrap in tape. Assemble the hilt and tape together. Taping the blade above and below the cup will ensure that it doesn\’t move too much. This bit is very fiddly and may require a couple of goes. It may also be an idea to assemble the cup hilt before attaching the rapier tip, so that the grip can be completed, then the cup hilt slid on from the top.
No Quillons
I have seen at least one fencer (Viscountess Murghein ni Ghrainne) who prefers not to have any form of quillon or guard at all. It seems to work quite well for her.
Edmund the Lame Elizabethan gentleman & adventurer
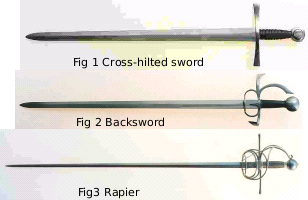
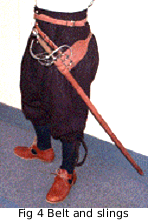
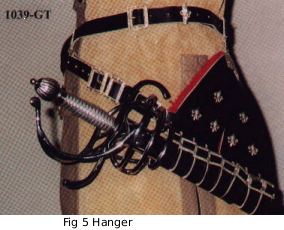
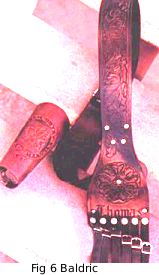
 Figure 1 – Jacket Drafting Pattern
 Figure 2 – Sleeve Head Pattern
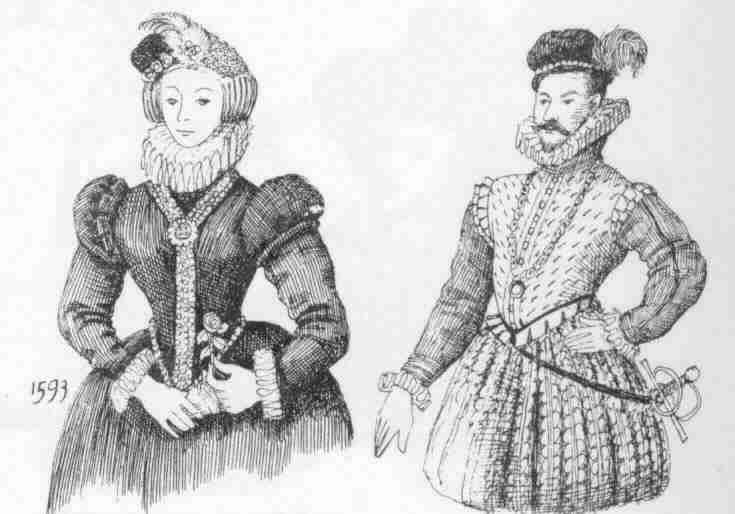
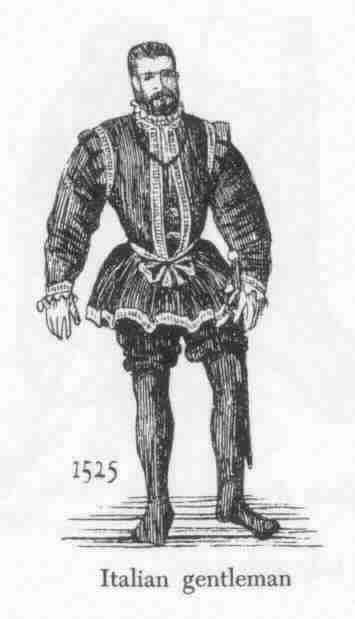
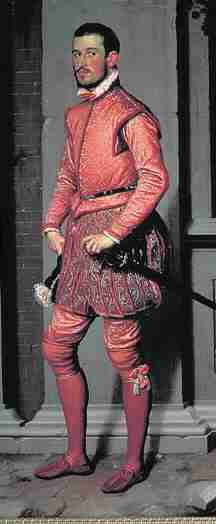
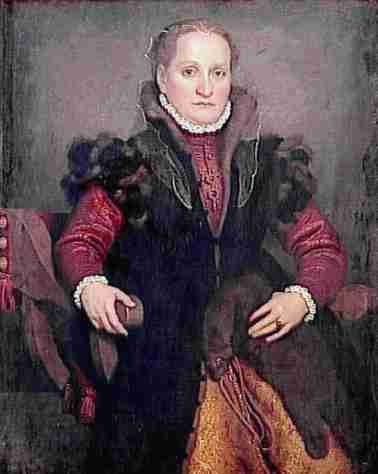
 Figure 4 – Antonio Moroni, Bergamo: Portrait of Angelica Agliardi di Nicolinis, 1565
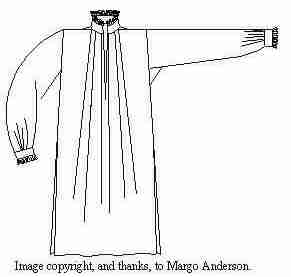
 This style of shirt is not only accurate for most of the sixteenth century, it’s also fairly easy to make and doesn’t require much fabric. It consists of a large rectangle, folded lengthwise at the middle. There are under arm gussets, for ease of movement. A T-shaped cut is made along the centre line, and the resulting opening is gathered to a neck-band or collar. The sleeves are also made from large rectangles of fabric gathered into wrist bands. Alternatively, there is an extant shirt in the People’s Museum of Zadar in the former Yugoslavia, which is thought to be of Italian origin and from the late sixteenth century. It was made by without gussets or wrist bands, and instead has gores inserted into the top of the sleeves for shaping.