by Guildmaster ibn Jelal, OWL
Originally published 25 Nov 2004
Introduction
Many of you will have seen the blue and white livery jackets used by the instructors of the Rowany Guild School. Many of you have asked how to make your own. Well I’ve finally bowed to the pressure, so the intsructions will follow.
When Luan first raised the idea to play a Pas d’Arms in rapier fencing at Rowany Festival 2003, the Rowany Guild School instructors decided we had to put a team together just to teach our whippersnapper student a lesson or two! 🙂 Guildmaster Silfren and myself both have a love of pagentry, so as a group we decided to have a common set of kit for the Pas, which would include some form of livery as fencing armour. Our plan set, it was it was time to go off and do some research on what is appropriate. We had settled on a rough time period of around 1500, since we didn’t want to go the whole doublet and breaches route. One of the things that caught our imagination was the work done by the Companie of St George over in Switzerland, which led us to the basic short sleeve livery jacket used during that period. (See the references for our sources of what could be done.)
With a rough design choice, there were a few criteria I had to address. (OK so I’m the one in the group that has the necessary sewing skills!) Firstly it should be fairly easy to make, as well as look good. It should be something that is easy to move in. It should be easy to get into and out of. It should be nice and light, so we don’t overheat. The last couple was driven by my nasty habit of overheating quickly. The short sleeve livery coats were perfect choices in this area, as they would go over a single layer long sleeve shirt, would be front opening using hooks and eye closures, and were very easy to adjust to fit all of us. The material choice ended up being 3 layers of calico, and an outer layer of cotton drill. The combination is exceptionally light, breathes very well, and passes the drop test for fencing armour. It looked like we had the makings of some great fencing armour. The truth is the four of us don’t really fence in anything else but the livery jackets these days, they ended up being so good to wear!
Drafting the Pattern
I used the basic jacket or arming jack pattern for the livery jackets. It’s easy to draft, and can be modelled for each person’s measurements. You need to take the following measurements to draft the pattern.
A = Shoulder width measured across back
B = Shoulder drop
C = Shoulder length from neck to shoulder point
D = Width across chest between arms (measure with arms held forward)
E = Chest circumference measured just under arm
F = Waist circumference
G = Hip circumference
H = neck to waist
I = waist to hip
J = total length (usually mid-thigh for a livery jacket)
Divide A and D in half, and divide E to G by 4. These are the measurements used for drafting the pattern, as shown below.
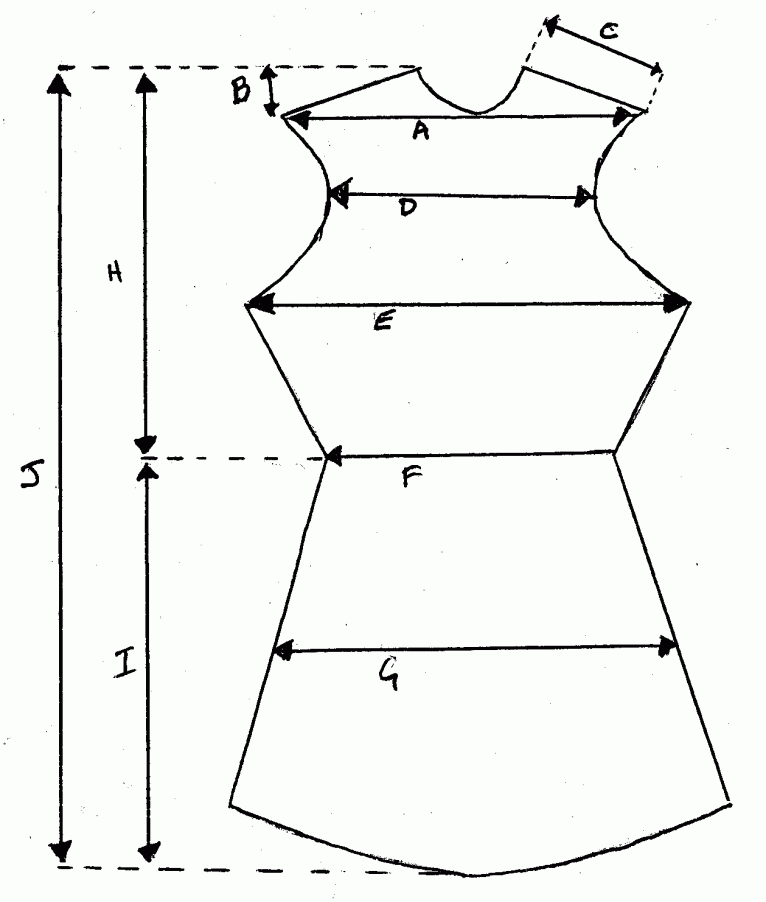
 Figure 1 – Jacket Drafting Pattern
This block pattern is your basis for cutting out the test pieces (a toile) to make sure you’ve got the pattern right. Use a cheap material for patterning, it’s going to be used mostly for getting the pattern right, not for wearing. I usually use calico for this bit. Mark out the pattern on the toile material, and then mark out the seam allowance lines, ie lines parallel to the pattern lines but wider by the required seam allowance. I generally use 1.5 cm for my seam allowance. Cut the toile material on the seam allowance lines, and sew them together on the pattern lines. Use a longer stitch length, say 3-4 mm since you’ll pull it apart later. Put on the toile piece, and check it for fit. Now is the time to make sure the arm holes are large enough, that it fits across the chest properly etc. Pin, remark and adjust the pattern until you’re satisfied it fits properly. In some cases you may need to pull the toile apart and recut and resew to get it right.
Make sure the jacket closes properly at the front. Just to make a quick note here, what you are looking for is that the edges pretty much butt up with a slight overlap for seam allowance. If like me you go for hooks and eyes, that’s all you need. If you want to use buttons or points for closures, you will need to extend each of those front pieces about 3 cm so that it has sufficient overlap for the closures. Here’s a hint if you go that route, write “extend by 3cm” on the toile piece openings so that you don’t forget!
Right, now you’ve got the body piece right, it’s time to measure up the armhole for the sleeve pattern. You want the armhole to be sufficiently large that the arm can move at the shoulder, and the toile piece doesn’t crease in response. The best way to describe it is the attachment lines of the shoulder muscles around the chest, should be about where the armhole is located. If the armhole cuts across those muscles, you get the feeling that the jacket is binding up the arm sometimes. Clear as mud isn’t it?!
Anyway, while wearing the toile, make 2 marks on the toile. One is about the middle of the armhole at the back, and the other is the middle at the front. If you look closely, there is a point in the armhole where it turns to go under the arm, that’s the best point to mark. Ok these points are numbered as follows, A = the middle mark at the back, B = the shoulder seam, C = the from middle mark, D = the side seam. Measure A-B, B-C, C-D and D-A. These 4 measurements will give you the correct shape for the top of the arm.
To draft the sleeve, draw 3 parallel lines about 3 cm apart from each other. Starting from the left of those lines, measure in your seam allowance and draw a line at right angles to the parallel lines. Mark this line ‘A’. Measure along the parallel lines distance A-B, draw another right angle line and mark it ‘B’. Repeat for B-C, C-D and D-A. Mark out the seam allowance beyond the right-hand side ‘A’. Measure down the line marked as ‘C’ and mark the distance that would be the length of the sleeve. This measurement is made from the middle line of the 3 parallel lines. Add a seam allowance to that line and draw a right angle line the length of the sleeve width at the end of your sleeve length line. Add a seam allowance to each end of the sleeve width line. Connect those 2 points to the seam allowance lines at the top of the sleeve, on the middle line of the 3 parallel lines.
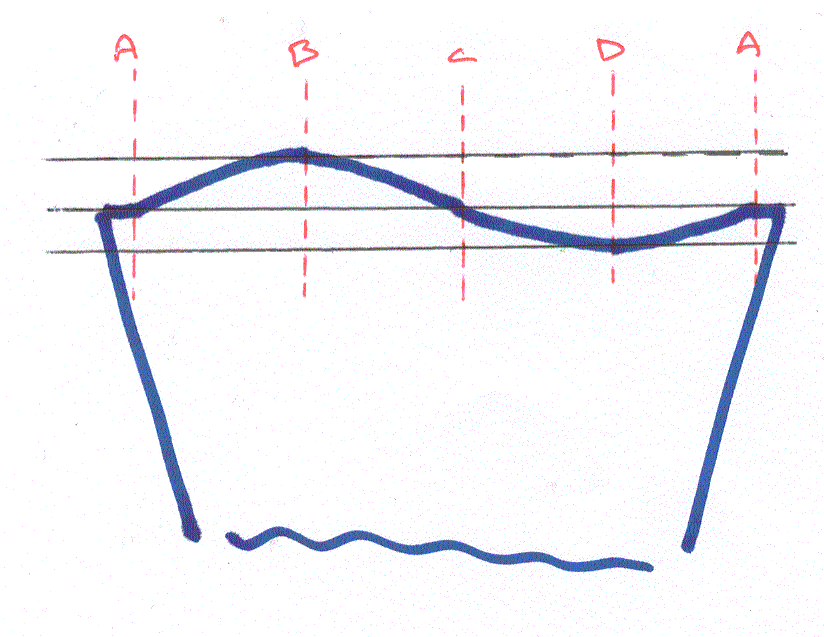
 Figure 2 – Sleeve Head Pattern
Now we get to draw the top of the sleeve. Starting from line ‘A’ on the left-hand side, draw a curve from the middle line to the top line at ‘B’. Continue this line, but curve down to the middle line at ‘C’, which then continues down to the bottom line at ‘D’, and then curves back up to the middle line at the right-hand side ‘A’. Connect the points at each ‘A’ line to the seam allowance lines.
You now have your sleeve pattern. Cut it out, join along the long ends and then set it into the main body. Make sure it can move properly and that it sits properly in the body part of the jacket.
Now you get to fiddle with the collar. I usually make them in 4 pieces. This is one where it pays to cut the ends a bit longer so that you can get the sewing lines correct. This has always been the most tedious part of the whole exercise, take your time and you’ll get it right.
Once you’re satisfied with the way the toile jacket fits, unpick all the seams on the toile, and label each piece for where it came from. The toile pieces for the front should be almost mirror images of each other, and so should the back pieces. Iron them flat and you now have your pattern pieces for marking out on the fabric you intend to use. You can use them as one of your foundation layers, or you can hold onto them as pattern pieces for future jackets, that choice is yours to make.
Putting it all together
Cut out each piece for your livery jacket, using the toile pattern pieces. I generally use 4 layers, so you’ll end up with 4 pieces for each pattern piece. Make sure you label the pieces as you go, otherwise you’ll lose track of which piece is what.
The simplest way to put all this together is as 2 shells. Try to make each shell roughly the same thickness as it makes it easier to sew. The order for putting the pieces together is body, then sleeves and then collar. Once you’ve done that you sew the 2 shells together.
First sew the two back pieces together. Then sew each front piece to the back piece, starting with the shoulder seam, then the side seam. Next, sew the sleeves up along the length and then set them into the armhole. Once both sleeves are done, put the collar pieces together and then sew in into the garment. Repeat for both shells.
Once both shells are done, you can now put them together. Typically, I sew them together and then turn it through. If you take this option, you need to leave a turn though gap at the bottom of the garment, and you don’t sew the sleeves together at all. Turn though the garment, fix the seams so it all sits neatly, then oversew the edge to hold it shut. You can now sew the ends of the sleeves closed as well. Oh and I’m assuming you’ll do all the necessary things like ironing seams flat, clipping curves etc.
Now it’s time to add your closure system. If you chose buttons or points go ahead and line them all up and make them happen. If you chose hooks and eyes, make sure the stitches holding the hooks and eyes in place go completely through the garment thickness, otherwise the shells will slide over each other and make an evil looking gap. Since the edges just butt up to each other with hooks and eyes, you also need to sew a placket behind the opening. Ours were about 10cm and folded and oversewn at the edges. In all of the closure systems, having each tie no more than about 6 or 7 cm is a good idea, since it helps prevent the opening from gapping.
You should now have a nice new comfy fencing jacket. There are lots of other ways you can make it look spiffy, so go ahead and have some fun doing so. The instructions on putting it together are really brief, if you have trouble ask one of the local sewing types for help. They can show you all the little tricks that’ll take me forever to write.
References
The following references all formed part of settling on design, providing clues on how to make the jackets etc. There is a huge wealth of information here. I highly recommend you take some time to have a look at some of it.
Nicolaa de Bracton of Leicester, A Few Practical Notes on the Construction of Rapier Armour, www.florilegium.org/files/COMBAT-RAPIER/Rapier-Armor-art.html/
Nicholas Andrew Cioran, Making a 14th or 15th Century Arming Jack,
barbute.com/articles/armingjack.htm
Rolanda Rossner, Techniques of Making Rapier Combat Armour,
rapier.ansteorra.org/publications/articles/RCARMOR1.pdf
Gwenneth of Glamorgan, “Towards a More Period Fencing Doublet”, Ansteorran Academy of the Rapier A.S.XXXV, rapier.ansteorra.org/publications/acad13/AoRBookletas35fnl.pdf
Gerry Embleton, “That We Myte Be Dressed… Clothing for The Company of Saint George”, Dragon No 2, January 1991, www.companie-of-st-george.ch/dragon-no-2.phtml
Gerry Embleton, “Jacks for the Company of Saint George”, Dragon No 3, September 1991, www.companie-of-st-george.ch/dragon-no-3.phtml
Angela Lowe and Keith Bartlett, “Making a Padded Jack”, Dragon No 5, May 1993,
www.companie-of-st-george.ch/dragon-no-5.phtml
Gerry Embleton, “Livery clothing, circa 1460-1480”, Dragon No 6, December 1995,
www.companie-of-st-george.ch/dragon-no-8.phtml
Gary Embleton, John Howe, The Medieval Soldier: 15th Century Campaign Life Recreated in Colour Photographs, Crowood Pr Ltd, 1995, ISBN 1859150365
Bartlett, Clive, and Gerry Embleton, English Longbowman, 1330-1515 (Warriors #11),. London: Osprey, 1995
Janet Arnold, Patterns of Fashion: The Cut and Construction of Clothes for Men and Women C1560-1620, Drama Publishers, 1985, ISBN: 0896760839
Gavin Malcoeur, “Jupons, Jacks, and Arming Coats” Tournaments Illuminated Issue #108, Fall 1993