by ibn Jelal
Originally published in Punta Dritta January AS XXXV (2001), revised 16 May 2003
Introduction
These blades are based on the techniques developed by Edmund the Lame (See Edmund’s Original fibreglass rapier construction instructions) Due to my preference for a more edge defined blade than Edmund’s triangular cross section, the design here is a slightly modified version to give a diamond section blade. I also encountered problems with the tips being far too fragile, and hence use a thicker rod for the tips. Once these tips are firmly taped, the blade will flex through the whole end section, unlike Edmund’s design, where only the tip rods themselves flex. There’s no real advantage in either system; it’s just my particular preference in how they feel. If I can feel the blade bending I don’t push as hard, which may have contributed to the early high failure rate.
I also tried to achieve a period feel for the weapons, so the design gives a sword that balances around 23% of the total length, measured from the hilt. This is similar to period rapiers in the way they balance. If you’re interested in the dimensions of period weapons, have a look at Gregory Stauf’s article.
Oh, I’m in Australia, so for all you US people you’ll have to convert the measurements from Metric to Imperial. Basically, all you have to remember is 1 inch = 25.4 mm or 2.54 cm. The quick rough conversion is 30 cm = 12″.
Materials
- 6.25 mm (diameter) fibreglass rod
- 4.1 mm (diameter) fibreglass rod
- 3.5 mm (diameter) fibreglass rod
- 6 mm internal diameter rubber stopper
- Fibreglass tape
- Vinyl tape – silver / grey and coloured
- Sandpaper, medium to fine grade
- Hot melt glue
- 19 mm copper pipe, cut to 15 cm lengths
- Epoxy glue e.g. Araldite
- Epoxy putty e.g. Selley’s Knead-It
- Pommel weight
Notes
Fibreglass rod is available from plastic / fibreglass manufacturers or from kite supply shops or from sailing supply stores but these are more expensive (retail vs wholesale). We’re fortunate in Sydney in that we have a company who manufactures pultruded fibreglass rod, which are used for sail battens. They also cut to size, so we don’t have to muck about with hacksaws etc to cut it.
I use soft rubber stoppers designed for chair legs. These are available from local hardware stores. A slightly larger internal diameter is OK. Make sure you get the smooth face ones (either flat or domed), some have a raised ring that acts like a percussion point when they hit, decidedly unpleasant. (Think hollow point bullets.) The dome-faced stoppers appear to last longer than the flat-faced stoppers.
Fibreglass tape is a plastic tape impregnated with fibreglass strands. Available at some hardware stores as a packing tape, or in good stationery supply stores, like Penfold’s. Comes in two basic widths, approximately 6 cm and 2 cm wide. The 2 cm stuff is really useful for initial taping / binding, and the wide stuff is what I use for covering and finishing the binding.
Vinyl tape is readily available here in hardware stores etc. The silver / grey tape is usually sold as vinyl duct tape (I’m told this is VERY different to US duct tape) and is about 6 cm wide. The coloured stuff is sold as electrical tape, and is about 2 cm wide.
Epoxy putty (ie Selley’s Knead-it) is a two part putty sold here for moulding repairs in woodwork and other various areas. I’ve found it extremely useful as it can be carved / shaped once hard, and binds extremely well. This makes an excellent cavity filler. If you use the hilt construction I’ve given, be prepared to just cut off any section you’ve used the putty on, it’s extremely difficult to remove from fibreglass rod.
For the pommel weight I use a cast bronze curtain rod finial, to fit 19 mm rod. They just happen to be the correct size for a counter-weight for fibreglass swords.
Equipment
- Hacksaw with fine tooth blade
- Pliers
- Vice
- Hot glue gun
- Craft knife or scissors
Safety Instructions
If you are going to be cutting and finishing fibreglass then you need to use adequate eye, respiratory and skin protection while doing so. You will be generating a very fine fibreglass powder that you do not want to inhale or get in your eyes. Keeping it away from your skin is also a very good idea. Even if all you are doing is taping the bare rod, I suggest you still wear disposable gloves, as it can irritate your skin very quickly.
Calculations
Following are the formulae I use for calculating rod lengths. These are essentially the same calculations Edmund uses, except they’re adjusted for the longer tips used by my design.
R = total length of rapier in centimetres (inches)
A = R – 20 cm (8″)
B = R – 30 cm (12″)
C = R – 37.5 cm (15″)
D = 30 cm (12″)
E = 25 cm (10″)
For the calculations I always assume a 15 cm (6″) handle.
A = length for 6.25 mm rod. You need one of them
B = length for 4.1 mm side rods. You need two of them.
C = length for 4.1 mm top rods. You need one of them.
D = length for 3.5 mm tip rods. You need two of them.
E = length for 4.1 mm quillon rods. You need two of them.
Note: when I first wrote this in 1999 I was using 4.1 mm tip rods. I have since moved to 3.5 mm tip rods, as I’m finding that the 4.1 mm can tend to S bend and hit hard just before failure, but the 3.5 mm rods do not. It’s not critical, just something to be aware of.
Blade Construction
Before commencing ensure that you have taken adequate safety precautions. Fibreglass dust and shavings is nasty stuff.
Cut your rods to the required lengths, as calculated above. A fine hacksaw blade is best for cutting the rod. Lightly sand the ends of each length to take the sharpness off the edges. This helps prevent the edge of the rod from cutting up your tape layers.
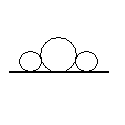
On a flat surface, butt your 6.25 mm rod (A) and the two 4.1 mm side rods (B) together. Bind together with short sections of your narrow fibreglass tape. Make sure the ends all line up at one end. I usually bind the two ends and the middle. The tape should not be right on the ends, but about 2 – 3 cm in from the end. Make sure the rods all lie flat on your bottom surface. Now glue the rods together using the hot glue, trying to keep the glue beads as even as possible. Try to avoid lumps, as this will make a wear point in your tape. Don’t panic if you get them, you can always sand or trim it back later. You should end up with a rod cross section like this:
Turn your blade over and place the top 4.1 mm rod (C) on top of the 6.25 mm rod. I usually find I have a nice channel from the hot glue that the top rod sits in quite nicely. Bind the rod to your glued rods using some more of your narrow fibreglass tape. Make sure all the rods are flush at one end. Now hot glue the top rod in place, following the same precautions. Don’t be too fussed with completely filling the gap with hot glue, you just need to stick the rods together. You should end up with a cross section that looks like this:

Now I usually wrap a strip of wide fibreglass tape around the forte section, stopping a centimetre or so just past where the top rod stops. Whether you spiral wrap, or do a longitudinal wrap is up to you, but my experience has been that a spiral wrap is overkill for taping this section.
Take your two 3.5 mm tip rods (D) bind them together at one end with narrow fibreglass tape. I usually wrap a strip around the end, and then another over the end to help prevent it punching through the rubber stopper. The loose ends are then bound to the 6.25 mm end of the forte, so that their ends butt up to the ends of the 4.1 mm side rods. Using the narrow fibreglass tape, bind in place with a strip at the end of the 6.25 mm rod, another about 2-3 cm from the ends of the tip rods, and lastly over the join area where the rods all butt together. Make sure the tip section remains flat and in line with the edge of the blade (side rods). The tip section can now be wrapped with wide fibreglass tape. I’ve found this works best if you spiral wrap, as it makes the tip section and forte end one flexible unit, and reduces breakage of the tip rods.
Push the rubber stopper over the end of the tip rods. Take a strip of narrow fibreglass tape and split it in half lengthwise. These strips are then taped over the rubber stopper in a cross pattern. The tape that runs down the side of the stopper is then bound down using 1 or 2 strips of fibreglass tape, which is wrapped around the side of the stopper, and just below the stopper. Repeat this with electrical tape, so that the fibreglass tape is covered.
The reason we tape it twice is because the fibre tape is great at holding them on, but gets brittle quickly in UV light, and loses it’s holding power. By covering the fibre tape with electrical tape, it protects the fibre tape from degradation. Electrical tape on it’s own doesn’t have the holding power to keep the tip in place.
Finally, wrap the blade with vinyl tape. Longitudinal wrapping is fine for this, but I’ve found it easier to do it in 2 or 3 sections. The vinyl tape should cover the bottom section of the electrical tape holding the rubber stopper in place. This really secures the stopper in place, and I’ve never had one come off. Some people also prefer to glue the stopper in place as well, but I’ve not found this necessary.
Your blade section is now complete. You can do all sorts of fancy things with it at this stage, but below is my usual hilting method.
Hilt Construction
The key to making a really good blade is having a very rigid handle section. The instructions here give a very rigid handle, that is relatively quick and simple to make.
Firstly, cut your copper pipe to the right length, and then cut two slots in one end, of about 5 cm in length. This should quarter the end of the pipe, but it works best if you have one pair of tabs slightly wider than the other.

Bend the thinner tabs out to an angle of ~90°. Lightly file the cut edges to remove burrs, sharp edges and corners.
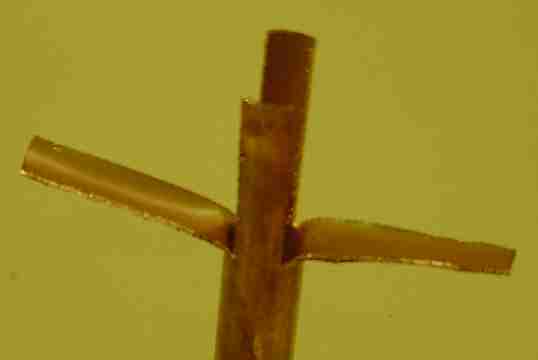
Using a pair of pliers, squeeze the wider tabs so that they start to curl around a tighter diameter. These tabs will grip around the side rods of your blade. Once you’ve got the approximate shape, insert the blade and crimp the wide tabs so that they tightly grip the side rods. Be careful you do not crush the side rods. Once crimped, secure with a strip of narrow fibreglass tape. You should now have a supporting tab projecting from each side of your blade.
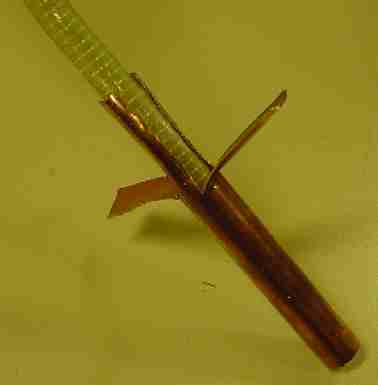
Take your quillon rods, and cover with a strip of fibreglass tape, as this helps prevent the rods being cut by your copper pipe during use. This is easiest if you lay out a strip the right length, adhesive side up, then line up your rod along the side of the tape and roll the rod over the tape, and the adhesive will cause it to wrap around the rod, without bubbling. Next tape both ends as you did for the blade tips, with narrow fibreglass tape. Slide the taped rods down the blade until it rests in the supporting tabs of the copper pipe. (If you are also trying to add a bell, you slide the rods and bell on as a unit. It’s tricky, but persevere, and take your time to get it right.)
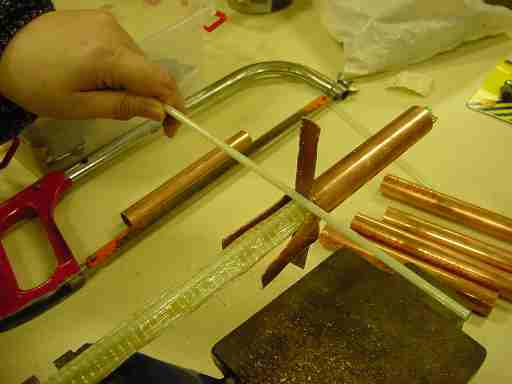
Fold the supporting tabs over the rods to hold them in place. Secure the whole arrangement with a couple of lengths of narrow fibreglass tape. The tape should be in an X pattern over the cross section.
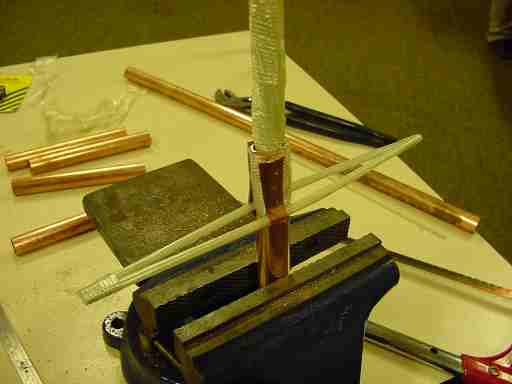
Cover the quillon lengths with some wide fibreglass tape, and then apply the rubber stoppers to the ends, and tape them on using the same taping method employed for the blade point. Finally, do a finishing taping with vinyl tape. I usually split the wide vinyl tape, to cross wrap the join section, and tape a strip over the quillons, securing the whole taping with a section of vinyl tape wrapped around the base of the blade, and wrapping a section of electrical tape around the top of the handle.
Prepare a blob of epoxy putty, and force this into the bottom of the handle, making sure the blade is centred inside the copper pipe. Clean off any excess and allow to set. Finally, glue the pommel weight onto the end of the handle with epoxy glue, and allow to set. Your new fibreglass rapier is now ready for use.
Acknowlegements
I’d like to thank Edmund the Lame for writing his original instructions, and answering my initial queries. The hilt construction pictures were taken by Silfren the Singer, who gets thanked for these, and for pushing me to write the instructions in the first place.

One reply on “Naysábúrí Rapier Blades Construction Guide”
[…] Naysábúrí Blade Construction Guide […]